[FIXED] Canvas Studio – Assignment Issue

A little over two weeks ago I posted about an issue with assignment file submissions and Canvas Studio. A fix has been developed and pushed to production.

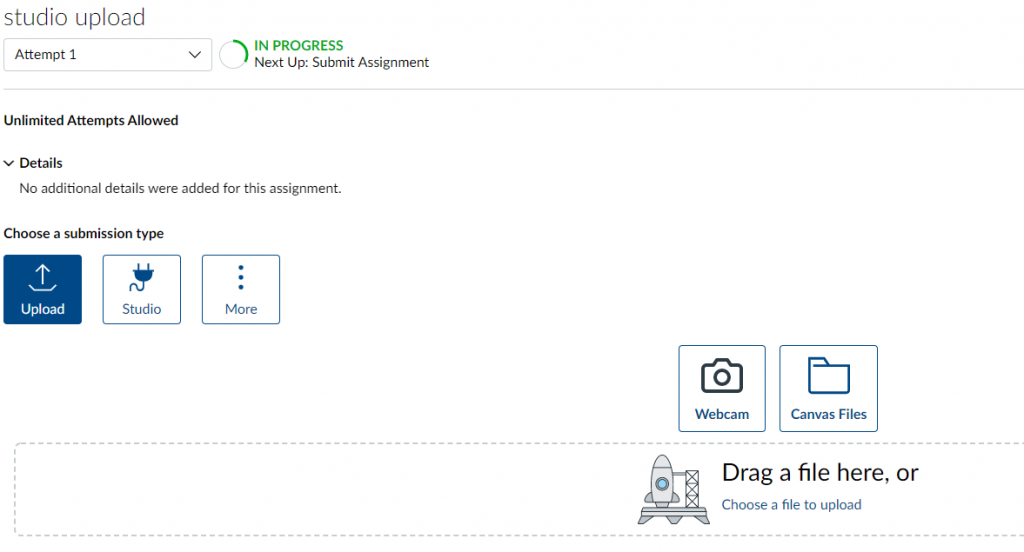
Students can now successfully submit media through Canvas Studio for assignments configured to allow File uploads as the submission type. The student interface for such assignments appears as:

The submission page for a Canvas assignment showing the options to upload a file, submit through Canvas Studio, and more.
Assignment – student file submission page

Students can click the Studio button to access their Studio Library and select the media they wish to submit. Once the assignment has been submitted the instructor may view the media in Speedgrader.

Canvas Studio – Assignment Issue

We recently became aware of an issue that is created by an account setting, Assignment Enhancements – Student, and Canvas Studio. The issue is described in detail here. We have contacted support and been added to the open engineering ticket. As soon as a fix is created we will be notified. The issue presents itself when a student attempts to submit a video from Canvas Studio as a file upload. The effect is that the upload fails and a document containing “Invalid Launch” is produced. This is what instructors will see in Speedgrader.

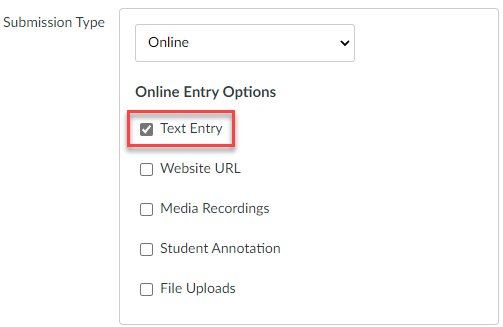
There are two workarounds for this issue: only allow students to submit to the assignment via Media Recording, or by embedding the Studio video in a Text Entry submission. I strongly recommend the latter.

Canvas submissions settings. Online text entry is selected.

If you have assignments in which students have already made submissions, you should be able to change the submission type setting without losing any data/submissions.

PowerPoint: Create Animated Video

I recently came across this video tutorial below showing how you can use PowerPoint to create engaging animated videos (yes, really). As the video illustrates, it is possible to create some fun, engaging, and impressive animated videos with only the tools and resources built-in to PowerPoint.

This video provides a good idea for a digital project you might have students create in lieu of another assignment format. The video also highlights some free resources that may be good for you or your students to use in the creation of other digital projects.

Recording Slide Presentations in Zoom

As we prepare to teach in a flexible manner for the fall, one question that comes up is how to provide what may have been lecture in a face-to-face class, to what will be a distance/online class in the fall. It is possible to use Zoom and PowerPoint to record a video containing a slideshow and webcam.

The general order of operations to use Zoom to record a PowerPoint slideshow is:

  1. Open PowerPoint and have the presentation ready to show.
  2. Open the Zoom desktop app in the same space as the PowerPoint.
  3. Start the Zoom meeting, share the screen containing the PowerPoint window, begin recording.
  4. Start the PowerPoint slideshow.
  5. You should see yourself in a small window on top of the presentation. You can move, resize, and minimize this window.
  6. Proceed through the presentation. Adjust your video/webcam window as you need through the presentation, but try to minimize the amount of movement.

    Note: You may want to format your slides to account for the webcam overly by leaving that area of the slides empty. Doing so will minimize how much you need to move the webcam overlay.
  7. Close PowerPoint. End the screen share. Stop the recording and then leave the meeting. The video will begin to process/convert. Once it is complete a folder with the video will open.

The process looks like a lot written down, but it isn’t as challenging in practice as it might appear.

PowerPoint Settings

There are two settings you will want to address in the Slideshow settings/ribbon. Take note of the monitor PowerPoint will use. Make sure that this is the same as the screen you will share from Zoom. Deselect “Use Presenter View.”

PowerPoint Slideshow Ribbon. Monitor settings highlighted in red box. Presentation monitor selected. "Use presenter view" deselected.
PowerPoint: Zoom Recording Settings

Zoom Settings

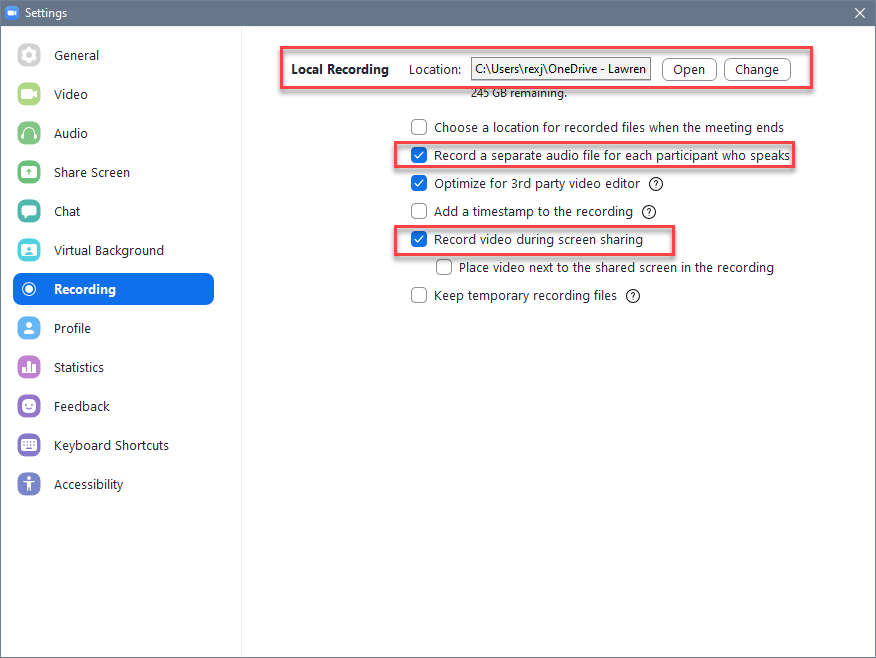
These settings may be accessed from the Zoom desktop app by clicking the gear icon underneath your profile image in the upper-right corner of the app window. You will only have to set these once.

In the Recording settings you will want to make sure to that you:

  • set a recording location
  • select to record a separate audio file
  • record video during screen sharing.
Zoom recording preferences. Make sure to set a recording location. select "Record a separate audio for each participant," and "Record video during screen sharing."

Lightboard!

The Lightboard, LU’s version of Learning Glass, is a way to engage students with lecture while maintaining eye contact with them. The current iteration supports recording of video that may be used in a flipped model. Instructional Technology invites any interested faculty to contact them about using the Lightboard.

Schedule a Demonstration

To schedule a demonstration of the capabilities of the Lightboard, please contact inst-tech@lawrence.edu.

Recording Tips

  • Plan to wear dark (not black) clothing so your writing will stand out better.
  • It may be helpful to practice on paper to position yourself correctly in relation to your writing.

New Resource: Podcasting 101

I write today to share a video playlist resource for faculty, and their students developed through a collaboration between Instructional Technology and Mudd Library staff. We have created a series of three videos in support of podcasting projects.

The videos are hosted on the Podcasting page within the Digital Media Toolbox. we invite any instructor interested in having students complete a podcasting project to use these videos. Not to prescribe use of this resource, but the videos could be used in a flipped workshop model, where students view the video(s) ahead of time and then Instructional Technology or the Mudd Library staff could attend a class to facilitate work on a facet of the actual project.

The playlist shares recording tips, resources the Library has to offer, and how to get started editing in Audacity.

Individual Videos

  1. Recording Tips (6:22)
  2. Library Resources (7:43)
  3. Getting Started with Audacity (10:44)

*** Make sure to check out the video description in each video for linked bookmarks to specific points in each video and other resources.

Libguides – Teaching and Learning

Logo image for Libguides. A blue cloud with a white laptop icon in front.

I write today to share a link to a number of resources. Since coming to Lawrence I have begun curating a number of guides in the “Teaching and Learning” category. The purpose of these guides is to provide resources for instructors and their students. This list of guides is chosen to support instructors in making their courses more active and inclusive; and supporting students in their coursework.

If you are interested in viewing other guides you may do so by navigating to the Library’s main page (https://lawrence.edu/library), and then clicking the “research guides” link located on the right under the “Research Guides” heading.

Rather than providing a summary for each guide in the teaching and learning list, I prefer to call out a few that I think are most important.

The first in this list is the Universal Design for Learning, Neurodiversity guide. Universal design for learning (UDL) is a design framework for reducing and removing barriers in the teaching and learning experience. Its purpose is to make the learning experience more inclusive and to produce self-directed and engaged learners. This guide provides an overview of UDL, explanations for each of the three principles (Representation, Engagement, and Expression), and an overview of what neurodiversity is and implications for teaching and learning. UDL has great potential to better the teaching and learning experience, particularly in the areas of student agency and executive function. One increasing issue faced on our and many campuses is clinical anxiety. UDL provides the means for an instructor to support a student by providing the structures and tools to help the student manage their work in a more digestible manner.

Second in the list is the Wikipedia as a Teaching Tool guide. One goal of all educators is to help students become producers of knowledge rather than solely consumers. Wikipedia is one tool that can help facilitate this is a pointed way. The platform provides a low barrier to entry for anyone to contribute to the repository of knowledge. This guide provides recommendations for instructors on how to have students evaluate Wikipedia, research with Wikipedia, and resources available to an instructor for teaching and students working in Wikipedia. One resource that I particularly want to mention is the WikiEdu organization. This group provides assignment examples and templates as well as design support for an instructor wanting to use Wikipedia in a course.

The third and last guide in this list is the Digital Media Toolbox. This guide was created with the purpose to be a resource for instructors and students in the creation of digital media. Among other things this guide provides information on copyright and citation of media, finding media that may be re-used in projects, and campus resources for creating projects. Digital media projects are a way to provide students options in how they show what they know (a tenet of UDL and the principle of Expression). They also allow the students to express creativity and participate in something that may be perceived as fun. These are all positives in a learning experience leading to increased engagement.

I invite you to review these guides in particular and the rest in the list too. Please feel free to reach out to me through comments or contacting me directly. I am happy to discuss the content in these guides and how it relates to the teaching and learning process.