Do you want to create a visually dynamic course home page? Do you want more design flexibility?
If so, you are invited to participate Create a Canvas Course Home Page workshop. In this hands-on workshop, participants will be guided through a set of steps that can be used to develop their own home page.
The session date/time/location is:
Thursday, October 20 10:30 a.m. – 12:00 p.m. Humanities Lab, Main Hall 108.
Do you want to create a visually dynamic course home page? Do you want more design flexibility?
If so, you are invited to participate in one of two workshops to create a Canvas course homepage. This will be a hands-on workshop. Participants will be guided through a set of steps that can be used to develop their own home page.
There will be two sessions. The same content will be presented in both. The session dates/time are:
Tuesday, September 27, 10:30 a.m. – 12:00 p.m.
Wednesday, September 28, 1:00 p.m. – 2:30 p.m.
Both sessions will be held in the Humanities Lab, Main Hall 108.
Please contact Jedidiah with any questions, or if you are interested in the topic, but unable to attend.
The sessions will be recorded live and then posted for everyone. You’ll be able to listen to these sessions on the ID Corner podcast, and view on YouTube.
The current plan is to release three “Tech Bites” episodes over the term every two weeks, beginning Tuesday, September 20, 12:20-12:30 p.m. The idea behind these is that you can just tune in while you grab a snack or lunch.
Microsoft has announced new features for it’s Whiteboard app. The scenario in the video pertains to Teams, but all the new functions pertain to the web version of the whiteboard as well. You should be able to use these tools whether on a Mac or Windows PC.
Some the notable (pun intended) additions are:
board templates (1:13)
the ability to import PowerPoint slides (3:25)
the ability to import PDF or Word documents (4:47)
You and your students can use this platform for free. The integration with Moodle allows seamless login from Moodle to Perusall and grade sync. Here is a brief video (0:31) describing what students may do on the platform.
In addition, a group of interested faculty met to learn about and discuss uses of Perusall. During the session Dr. Scott Corry shared how he used Perusall last Spring term. You may view the recorded session here (51:40, only available to Lawrence faculty and staff)
Connecting Perusall to your Moodle Course
You connect Perusall to your Moodle by creating a Perusall activity in your course. To do so:
Turn editing on
Click the “Add an activity or resource” link.
Select the External Tool and click Add.
Give the activity a name (“Perusall” should work.)
Select “Perusall” from the Preconfigured tool drop-down menu.
Scroll down and click the “Save and return to course” button.
Once you do this you should see the activity in your course. From here you can click the link to the activity. Doing so will create your Perusall course based on your Moodle course. You will notice that the Perusall course link will contain the Moodle course name. Once this is complete this activity should be hidden from students.
From here you can follow the prompts In Perusall to add materials to your Perusal course and create assignments.
Adding Perusall assignments in Moodle creates the grade sync from Perusall to Moodle. Students should use the links for specific Perusall assignments. The instructions on this page in the “Setting up Assignments” section share instructions for creating a Perusall assignment in Moodle.
The steps for creating a Perusall assignment in Moodle are very similar to the steps for connecting Perusall to your Moodle course.
Turn editing on
Click the “Add an activity or resource” link.
Select the External Tool and click Add.
Paste in the assignment name copied from Perusall.
Select “Perusall” from the Preconfigured tool drop-down menu.
[Optional, if you use the Moodle gradebook and want grade sync] expand the Grade section and:
Select Point for the Type.
The Maximum grade may be left at 100.
Select a grade category
Grade to pass may be left alone.
Scroll down and click the “Save and return to course” button.
One recommendation that Dr. Corry mentioned was to allow yourself freedom and time to test the grading settings in Perusall to make sure that Perusall is functioning the way you wish.
Perusall is not just for documents
It is possible to import a video to Perusall and have students annotate the video. Students may watch the video and make comments as they watch. Comments will be timestamped to the video. Here are some instructions from Perusall about using video.
The Lightboard, LU’s version of Learning Glass, is a way to engage students with lecture while maintaining eye contact with them. The current iteration supports recording of video that may be used in a flipped model. Instructional Technology invites any interested faculty to contact them about using the Lightboard.
Schedule a Demonstration
To schedule a demonstration of the capabilities of the Lightboard, please contact inst-tech@lawrence.edu.
Recording Tips
Plan to wear dark (not black) clothing so your writing will stand out better.
It may be helpful to practice on paper to position yourself correctly in relation to your writing.
I have been thinking and talking a lot about universal design for learning (here and here) and looking for ways/tools for instructors to share with students. Texthelp offers a platform called Read&Write (RW). While providing a number of capabilities (see the full list here,) RW is a text-to-speech (TTS) tool. The tool is available for a number of platforms, but I will be talking about the Chrome extension. Before going further I do want to point out that our Center for Academic Success can make the full version of this application available for students who need it. Tools like this are certainly beneficial for those who need them, but they can also provide helps for English-language-learners as well as provide another way for any student to interact with the material.
What we will be looking at here is the Read&Write for Google Chrome extension. As a Chrome extension it will only work in the Chrome browser and can only interact with content hosted on the Internet. By way of comparison the desktop application can open and read PDF documents saved to the computer.
Once installed the extension lives with all the others in the upper right of the browser. Once you are on a page you would like to be read aloud you can click the extension o bring up the toolbar.
The full toolbar looks like this:
It is outside the scope of this post to talk about all the functions of the toolbar. We will only be talking a small subset, which you can see below.
The three buttons on the left are the play controls for the TTS function. The next tool is a screenshot reader. You can take a screenshot of some text and then RW will read the text to you. The latter buttons on the right are highlighting controls.
Reading web pages is all well and good, but much of the reading students will do is from the humble PDF. This format in and of itself is not accessible. There are processes, namely optical character recognition, or OCR, that renders the text and make it searchable. OCR is the process by which a computer determines what the underlying text in a document is. There are many factors that play into the success of the OCR process. For a deep dive into OCR watch this video. once this has been done a number of options open up for manipulating the document. One major option is that the text may be read aloud.
As mentioned before the RW Chrome extension will only read documents/text that are on the Internet. This is where Microsoft Office 365 comes into play. Any OCR’d PDF that lives in OneDrive may be read aloud by the RW extension. In addition one can use the highlighting tools to highlight the text contextually – assigning an idea to a color, e.g. yellow for all main ideas and green for supporting arguments. Once the highlighting is complete all the highlights can be pulled into a single Google Document*.
*This unfortunately does require a Google account and access to Google Drive.
One note, certain capability is available for free and some only available after purchase. You can see the full list here. Texthelp does offer a free premium account to educators.
The Vanderbilt University Center for Teaching provides a very good definition of active learning. They define active learning as,
“… activities that students do to construct knowledge and understanding. The activities vary but require students to do higher order thinking. Although not always explicitly noted, metacognition—students’ thinking about their own learning—is an important element, providing the link between activity and learning.”1
I appreciate this definition as it touches on three important ideas:
Constructivism – the idea that students can/will construct their own knowledge and understanding through the learning experience
Bloom’s Taxonomy – pushing the students toward higher order thinking
Metacognition – providing opportunity for the students to think about what and how they are learning
These ideas work in concert.
The end-goal of any active learning strategy is three-fold:
Increase student engagement
Increase student motivation
Increase knowledge retention by creating a more impactful learning experience.
Strategies
There are a number of varying strategies that fall under active learning. A common characteristic of many of these strategies is that they involve students working in collaborative groups. The guide referenced earlier,1 lists a number of strategies. Some of the strategies being employed on Lawrence’s campus are the Jigsaw Method and Team Based Learning (TBL). Others are using manipulatives with collaborative learning groups, a walking meeting model, or movement based collaboration around connecting to literature.
Challenges
As with any strategy there are challenges associated with active learning. A few of those include managing group dynamics, space limitations, and assessment of group work. There are countermeasures of course, but using active learning strategies must be approached with forethought.
On-Campus Resources
If you are interested in utilizing active learning strategies into a course there are people and places below that will help you in your endeavor.
Personnel
If you are interested in trying or adapting active learning strategies in your pedagogy, please reach out to any member of the Instructional Technology Team:
David Berk – Dir. of Instructional Technology, x6756
Arno Damerrow – Instructional Technologist, x6710
Jedidiah Rex – Instructional Designer, x6729
Spaces
The following spaces have been designed specifically with active learning in mind. While these spaces are specifically designed for active learning, the Instructional Technology team may be able to help you identify the best space to meet your needs.
I am pleased to announce that I will be offering a workshop around active learning.
The workshop details are: DATE: Thursday, January 10 TIME: Convo hour (11:10-12:20) LOCATION: Main 401.
During the workshop we will review what active learning is, and specific active learning strategies. We will hear from a couple instructors about their experience using active learning strategies in their teaching. We will conclude the time with an activity designed to help us identify solutions to active learning challenges.
I hope to see you there. Please RSVP via this form if you wish to attend.
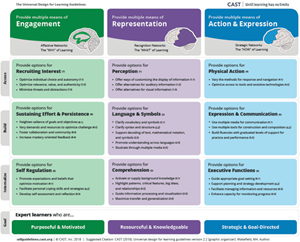
UDL Guidelines. Click the image to view an interactive version.
“Universal Design for Learning (UDL) is a set of principles for curriculum development that give all individuals equal opportunities to learn. ”1
UDL has its beginning in the universal design architectural movement which came out of “barrier free” movement. The term universal design was coined by Ronald Mace (North Carolina State University) in the 1960’s. Some examples of universal design are:
Smooth, ground level entrances without stairs
Lever handles for opening doors rather than twisting knobs
Universal Design for Learning was created by David H. Rose, Ed.D. of the Harvard Graduate School of Education and the Center for Applied Special Technology (CAST) in the 1990’s. UDL, based on research in neuroscience, uses three principles. These principles are to provide: 2
Multiple means of representation
Multiple means of action and expression
Multiple means of engagement
The three UDL principles are based on three learning networks. The three networks are recognition, strategic, and affective.
The recognition network deals with, “how we gather facts and categorize what we see, hear, and read.”
The strategic network deals with how we plan and perform tasks,” and “how we organize and express our ideas.”
The affective network deals with how, “learners get engaged and stay motivated.”
There are other uses of universal design in teaching and learning:
UD for Instruction (UDforI)
UD of Instruction (UDI)
While similar, they are not the same as universal design for learning. UDL is distinctly focused on the student experience and attending to varied ways students may approach a learning experience.
Two common ideas and terms withing the UDL framework are the ‘myth of the average‘ or ‘learner variability.’ These terms point to the idea that students vary (in strengths, background, experience, perspective, and many more) from context to context, and from day to day.
UDL is meant to address this variability by providing as many on-ramps to the course material as possible, and as many means for the students to demonstrate what they have learned. You may be saying, “Well isn’t this just differentiated instruction?” One analogy in, Design & Deliver: Planning and Teaching Using UDL3, by Loui Lord Nelson, compares differentiated instruction to creating single meals for each student while UDL is a buffet. The buffet allows each person to choose those things that the like and that work best for them.
Here is a link to the guidelines. The way that this chart is organized is by principle. Under each principle are three guidelines. Each guideline then has a few supporting checkpoints. Each of the checkpoints in this chart are linked to further explanation. The three levels on the left-hand side, access, build, and internalize, speak to increasing levels of engagement of students with the learning materials. The checkpoints are what we use to identify the specific strategies we will employ as we design a specific learning experience. I have attached PDF copies in the “resources” section of the guidelines and the graphic organizer to this post.
Let’s dig a little deeper into the checkpoints to see how we might apply them. Some examples are below.
1 – Provide options for perception.
The mighty PDF. Quite ubiquitous in the higher-ed environment and at the core and inaccessible file. The PDF file format is technically an image. Even though we can see text, there isn’t any underlying text that may be manipulated. Optical character recognition, or OCR, is the process of identifying or extrapolating the text within an image. Adobe Acrobat Pro is one example of software that can do this for PDF documents. Once this process has been completed other options for interacting with the document become available. Such affordances are:
having the document read aloud – providing another mode of interaction. Toward this end there are programs, web tools, and mobile apps that can help facilitate this.
searching the text – making the document a study/research tool.
Redeeming time – the ability for a student to listen to the document on a mobile device allows the student to listen when they have time e.g. student athlete traveling to/from and event.
3.3 – Guide information processing and visualization.
Mind mapping or concept mapping provides a way for the student to organize information and make connections between the ideas.
5.1 – Use multiple media for communication.
Providing the student audio or video feedback allows tone and non-verbal cues to be communicated. Making this an option for students can provide assistance to those students who are better explaining ideas verbally than in writing.
5.2 – Use multiple tools for construction and composition.
Allowing students to create a podcast as an option to writing a research paper gives the students a creative alternative.
6.1 – Guide appropriate goal setting.
Providing time estimates for readings/materials supports the student in managing their own work, planning and prioritizing for when works best for them.
6.3 – Facilitate managing information and resources.
Chunking, or breaking a larger task or piece of information supports the student in managing the task and/or understanding the larger idea.
6.4 – Enhance capacity for monitoring progress.
Helping students to see their progress in a course can allow them to better assess their work and the learning they are doing. Course completion tracking in Moodle is a tool that could be leveraged to support this.
7.1 – Optimize individual choice and autonomy.
Providing alternative formats of course materials and providing options for assignments and activities support this checkpoint. Other strategies that may do so also are creation of class norms, collaborative assessment/rubric design in which the instructor and class work together to create the assessment or rubric.
7.2 – Optimize relevance, value, and authenticity.
Whose voices are represented? Are the materials relevant to all the learners? How can they made to be relevant?
8.1 – Heighten salience of goals and objectives.
The more an instructor can deliberately share of the “why” of the task/assignment/activity/process, the better the students will understand the importance of the said task/assignment/activity/process, and most importantly be more engaged and motivated in the learning process.
8.3 – Foster collaboration and community.
Shared class notes are a way to foster collaboration and to support students who may not be as strong in this area.
8.4 – Increase mastery-oriented feedback.
Providing learners feedback that a particular response is correct or incorrect really only provides limited information. Creating feedback that guides a student toward discovering the correct answer supports this checkpoint. Utilizing Moodle quiz feedback and the question bank are examples of a tool that an instructor might use.
9.3 – Develop self-assessment and reflection.
Including metacognitive prompts – “What worked?,” “What didn’t?,” “Why?,” “What would help you learn?” – Can support the student in taking control of their learning, knowing themselves better and provide them the means to identify and search after those things that help them the best/most.
Some things to keep in mind or questions to ask as you consider adapting a learning experience within the UDL framework:
What does this design change require? Technology? Time? Funds?
What are challenges against this design change?
How easily could this change be implemented in a course?
How might you assess the impact of the change?
Take-Away’s
The hour for the workshop went by very quickly. Everyone was able to get something out of the time together. One common thread was appreciation for the analogy of UDL being a “buffet” – providing options for the students to choose what they like and works best for them, versus differentiated instruction where you are making separate meals to fit each student. Others from the workshop voiced appreciation for the time and space to talk with peers about what colleagues are doing and realizing that they are dealing with a lot of the same issues.
This workshop was a great experience for me as a facilitator and I look forward to discussing these ideas further and working with instructors to implement these and other strategies into the teaching and learning experience.
http://udlguidelines.cast.org/ – This is an interactive web version of the guidelines. You can click on each of the checkpoints for more information and suggestions for application.
Books
Design and Deliver: Planning and teaching Using Universal Design for Learning – Loui Lord Nelson, PhD. Available in the Lawrence Library.
Universal Design for Learning in the Classroom: Practical Applications (What Works for Special-Needs Learners) 1st Edition – Tracey E. Hall, Anne Meyers, David H. Rose Available in the Lawrence Library.
Universal Design in Higher Education: From Principles to Practice 2nd Edition – Sheryl E. Burgstahler, Michael k. Young Available in the Lawrence Library.