There may be an instance where you need to share your course syllabus. In this day and age of digital learning management systems (LMS) some instructors use the online course page(s) as their syllabus. Some of these systems can make it more difficult to capture the appropriate content in a meaningful way. Thankfully, Canvas has a way that an instructor can export their course to an ePUB file, and then with free online tools, convert it to a PDF.
To do this:
Open a course.
Navigate to Settings>Feature Options and turn on ePub Exporting. (You will need to repeat these first two steps for each course you wish to export.)
Next, navigate to your Account (far left column, Global navigation).
Select Settings>Download Course Content.
A page will open that shows the course with the option to download as an ePUB file. After downloading you can convert the ePub to a PDF using any online file converter. One option is Convert.io. (This site does other conversions. This link is specifically to the ePUB to PDF conversion.)
Thank you to Peter Peregrine for discovering and sharing this option.
This post is a companion to the demonstration I offered during the “CRITICAL CONVERSATIONS AND PRACTICES SERIES : READING AT LU: MINI – CONFERENCE,” on February 9, 2023about using Zotero and Obsidian.
Why? I was in search of a way to efficiently capture notes that would help me think about what I read and make connections between ideas. I needed a personal knowledge management system, or PKM. I had been using OneNote for my notes, but felt limited by the hierarchical structure. OneNote has a search function but the way things are organized made it more difficult to make connections between ideas.
The Zettlekasten method, created by a German sociologist Niklaus Luhman, provides a workflow for taking in information and making connections between your ideas. The Zettlekasten means slip boxes. The zettlekasten workflow consists of taking fleeting notes, putting those into your own words as literature notes, and then taking those and turning them into new ideas as permanent notes. Luhman used a system of numbered cards to catalog his thoughts and ideas. It was this system that helped him be very prolific, publishing more than 70 books and 400 scholarly articles.
The system that Luhman created is made easier to implement now that we have computers. We have the ability to take what were physical cards (Luhman had roughly 90,000) and store them easily in a digital file system. There are a number of tools to do this, of which Obsidian is one. Obsidian is a non-linear notetaking system allowing you to make and see (important) connections between ideas. Obsidian uses markdown to efficiently format your notes. Using markdown makes it easy to link between notes. Entering two square brackets allows me to easily link to other pages. Obsidian shows me the links between items so that I can follow my train of thought.
Workflow
Gather Fleeting Notes
Process Fleeting notes into permanent notes and MAKE CONNECTIONS!
Moving Notes from Zotero to Obsidian
Collect items/PDFs in Zotero – web clipper, DOI, etc.
Read and annotate in Zotero (Fleeting notes)
Right-Click on the item title in Zotero and Extract Annotations. Hide colors, hide citations.
Copy item title.
Right-click on note and export the note. Select Markdown format. Select “Include Zotero links.” Save in Obsidian Vault (paste in item title and date into file name.)
Think about notes and make connections in Obsidian (Permanent Notes)
Capturing webpages as PDFs into Zotero
Install Zutilo Zotero add-on.
Add keyboard shortcut for attaching a new file. CTRL+P recommended.
On Thursday October 27, our Canvas Success Managers (CSM) team presented a webinar on how to reuse and share course content. There were a number of points that I think are pertinent and helpful to faculty using Canvas.
Here is a list of specifically helpful points:
Course Copy (7:15) – you can use this to copy course content from one course into another. You might use this to copy course content from one term to the next.
Course Export/Import (10:52) – You can use this to share course content with other instructors. See our FAQ about this.
Adjust assignment due dates (8:55; 10:14*) – Canvas provides two ways to change assignment due dates. This is a handy feature when copying course content from one term to the next. *The method shown here may be the better option imho.
Direct share (Copy To/ Send To)
Copy to (15:50) – This allows you to copy a module or specific content within a module from one course to another without copying/the entire course. You can use this to copy an assignment you created in one course to another/future term.
Send to (22:00) – This allows you to send a single piece of course content to another Teacher without creating a course export. You can use this to share an assignment, page, quiz or something else from your course for another Teacher to use.
You can access the notes/resources and video of the webinar at:
Do you want to create a visually dynamic course home page? Do you want more design flexibility?
If so, you are invited to participate Create a Canvas Course Home Page workshop. In this hands-on workshop, participants will be guided through a set of steps that can be used to develop their own home page.
The session date/time/location is:
Thursday, October 20 10:30 a.m. – 12:00 p.m. Humanities Lab, Main Hall 108.
Do you want to create a visually dynamic course home page? Do you want more design flexibility?
If so, you are invited to participate in one of two workshops to create a Canvas course homepage. This will be a hands-on workshop. Participants will be guided through a set of steps that can be used to develop their own home page.
There will be two sessions. The same content will be presented in both. The session dates/time are:
Tuesday, September 27, 10:30 a.m. – 12:00 p.m.
Wednesday, September 28, 1:00 p.m. – 2:30 p.m.
Both sessions will be held in the Humanities Lab, Main Hall 108.
Please contact Jedidiah with any questions, or if you are interested in the topic, but unable to attend.
The sessions will be recorded live and then posted for everyone. You’ll be able to listen to these sessions on the ID Corner podcast, and view on YouTube.
The current plan is to release three “Tech Bites” episodes over the term every two weeks, beginning Tuesday, September 20, 12:20-12:30 p.m. The idea behind these is that you can just tune in while you grab a snack or lunch.
Microsoft has announced some great new features for Microsoft Forms. Some of these have been implemented and we are still waiting on some.
Some notable additions are that the new form and new quiz buttons have been separated into two distinct buttons and forms will now accept up to 5 million responses. One addition that is very exciting is that it is now possible to import a form or quiz from a Word or PDF document! This should make drafting forms and quizzes much easier. Check out the video below for more details.
Table of contents 0:00 Introduction 0:09 Forms home page improvements 1:20 Forms templates 2:34 Forms Quiz – Smart Convert from Word or PDF document 4:43 “Collect Responses” rename 5:46 5M max response 6:13 Polls app rename in Teams meeting 7:07 Word Cloud in Teams meetings
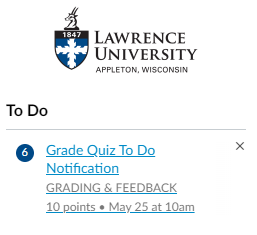
A couple months ago I shared a note about New Quizzes – a new quiz engine being developed in Canvas. In that post I share a couple known issues. One of those was that manually graded questions were not appearing on the Dashboard in the To Do list for instructors.
I am pleased to share that the Instructure development team has implemented this capability for New Quizzes. It is now possible to receive a to-do notification for manually graded items within quizzes. You can see an example notification below.
New Quizzes To Do List item
Another update Instructure shared relates to the Fill In the Blank question type. It is now possible for instructors to use the rich content editor as they create fill-in-the-blank questions. The provides more formatting options and the ability to integrate formulas into the questions. This video (2:22) demonstrates the expanded capability.
I had the opportunity to facilitate a workshop focused on a couple more advanced page editing options. We investigated how to create responsive tiles and creating tabbed pages. The purpose of these options is to create a visually engaging, responsive, and accessible page. The code to create tabs is based on what I found on this page. The code to create the responsive tiles was created through experimentation based on information gathered across many pages and forums.
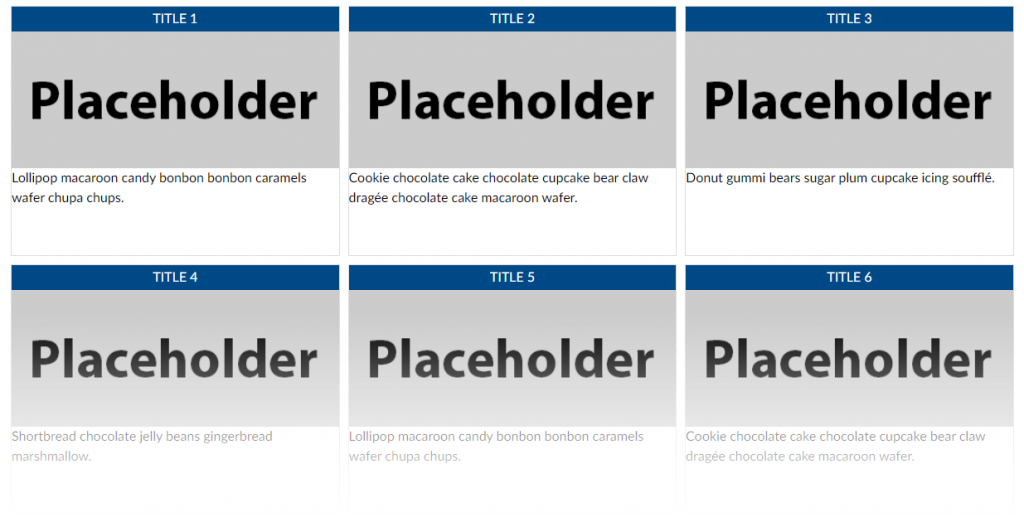
Tile/Button example.
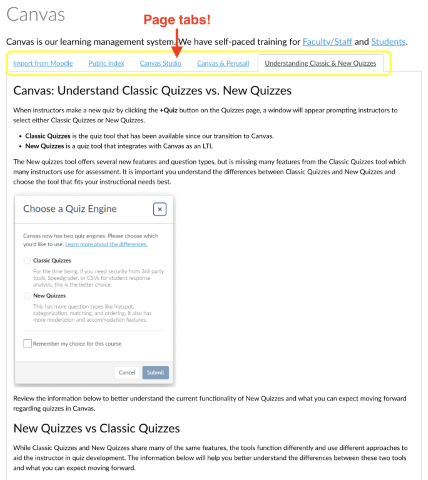
Tabbed page example.
Code Examples
A snippet of the tiles HTML code for the tiles/buttons is below. I have separated each element with a line break to see each more clearly. This is followed by an explanation of what each piece is doing.
The first div serves as a container for all of the tiles or buttons, which are each their own div. The id allows us to give each div a name as a reminder of its function.
Each tile or button uses the same structure: div – an opening div tag to define the button structure. h2 – a heading to contain the button title. p – a paragraph to contain an image. p – a paragraph to contain a link and/or description for the button destination. div – a closing div tag.
The width of the div is set as a percentage of the total page width. You can change this based on how many buttons you want to be tiled horizontally based on the overall page width. You can edit the height as you need/want. The min-width, margin-right, and margin-bottom allow the divs to tile correctly as the page becomes smaller (or on mobile). I recommend leaving these as they are. You can elimiate the border if you want by setting the width to “0px”. You can also change the color of the border if you want by entering a different HEX color code.
The h2 creates a heading for the button. You can remove this line if you do not want it. You can edit the background and/or text color by changing the HEX color code for the “background-color” and/or “color” element.
The first paragraph tag contains the button image. The “p style” allows the full image to be displayed without any space between it and the h2 heading. The image styling (display: block; margin-left: auto; margin-right: auto;) centers the image in the paragraph.
This last paragraph contains the link to a page or other course element. The “text-align: center” style centers the text in the paragraph.
These are followed by each of the closing div tags.
Let’s turn to the tabbed pages. Here is the code:
<div class="enhanceable_content tabs">

<ul>
<li><a href="#fragment-1">PUT TITLE FOR TAB HERE</a></li>
<li><a href="#fragment-2">PUT TITLE FOR TAB HERE</a></li>
<li><a href="#fragment-3">PUT TITLE FOR TAB HERE</a></li>
</ul>


<div id="fragment-1">PUT THE CONTENT FOR THE FIRST TAB HERE</div>
<div id="fragment-2">PUT THE CONTENT FOR THE SECOND TAB HERE.</div>
<div id="fragment-3">PUT THE CONTENT FOR THE THIRD TAB HERE</div>

</div>
Make sure to edit the tab titles in HTML mode and not in the rich content editor. Doing the latter may introduce display issues with your page. You can add more tabs by copying and renaming each list (li) item. Make sure you copy from the opening li tag through the closing li tag. You will also need to make sure to add a corresponding content area.
Recommended workflow – create separate pages in Canvas for each tab content. Once the individual page is complete, copy the HTML from that page into the “PUT THE CONTENT FOR THE NTH TAB HERE” location. This will allow you the flexibility of more easily working in the rich content editor with the content and preserve the page structure within this code