Moving course materials from Moodle to Canvas is fairly straightforward. The video below will help if you are interested in importing a course from Moodle to Canvas.
Tag: Moodle
Moodle Support Videos and Links
This post will be used to host links to all the Moodle workshop, support videos, and links. Links will be grouped as best as possible by topic. If there is a Moodle support topic you would like to request, please contact Jedidiah Rex.
Course Design
- Moodle FAQ (Moodle site, log in to view)
- Moodle: Extreme Makeover (blog post)
- Moodle Basics (video, 9:17)
- Moodle Import Process (video, 3:34)
Grading and Assessment
- Moodle: Natural Grading (video, 6:48)
- Moodle: Demystifying the Gradebook (video, 1:18:12)
- Moodle Annotate PDF (video, 10:15)
Tools
- Moodle + Perusall (video, 51:40)
Moodle: Demystifying the Gradebook Session Summary
The Moodle gradebook can be a confusing, headache-inducing, tangle. But it doesn’t have to be. The strategies shared in this session and post can help make the Moodle gradebook more clear to instructors and students about how grades are calculated. Bringing clarity increases transparency making the gradebook more usable and inclusive.
There are a number of different methods to arrive at a grade, called aggregation methods. There are three which were the focus during the session: weighted mean of grades (WM), simple weighted mean of grades (SWM), and Natural aggregation. These three methods should be able to address the majority of desired grading scenarios.
Each of these may be used to arrive at the same grade. But they each calculate grades in a slightly different way. One big difference between WM, SWM, and Natural is that the first two normalize the grades to be out of 100 (points or percent). This can potentially create lack of clarity about how a grade is calculated. Natural used to be called “Sum of grades” and at default functions in the same way. For Natural then, the category and course totals are a sum of all the grades contained within. You can see a comparison of the three methods in the session video beginning at 0:07:50.
Strategies
Whether an instructor chooses WM-SWM or Natural grading there are some strategies that can be utilized to make the Moodle gradebook more usable.
Start with your syllabus – What is meant by this is that an instructor should review how their grading strategy is laid out in their syllabus and replicate this in the Moodle gradebook. Many instructors use categories of grades i.e. Assignments, Quizzes, Exams, Final Exam, or Participation. Create these categories in the gradebook first, before adding activities or grade items. In addition to creating an organizing structure this approach allow an instructor to add activities directly to categories when they are created making less work down the road.
Use numbers – The Moodle gradebook calculates most accurately with numbers. It can use and display letter grades, but doing so can introduce some variability. For instance, does an “A” mean 100, or 94, or… ? Scales (check, check minus, or satisfactory/unsatisfactory) are difficult or impossible in some cases for Moodle to use in calculation. If an instructor desires the grades be displayed in certain way there are options for controlling this.
Keep it simple – While it is possible to mix and match aggregation methods, to use extra credit, drop the lowest ‘x’ grades, and nest categories, doing so can make it less clear to students how a grade is calculated. Anything an instructor can do to make this is as clear as possible limits challenges to grades, and through understanding created through transparency, allows the student to engage more fully.
If you have questions about setting up your gradebook, or about grading in Moodle please contact Jedidiah Rex.
Session Video
The recording of the session (1:18:12) is posted below. It is only available to Lawrence University faculty and staff.
Resources
https://docs.moodle.org/38/en/Grade_aggregation
https://docs.moodle.org/38/en/Grades_FAQ
https://docs.moodle.org/38/en/Grader_report
Moodle: H5P update and Grading
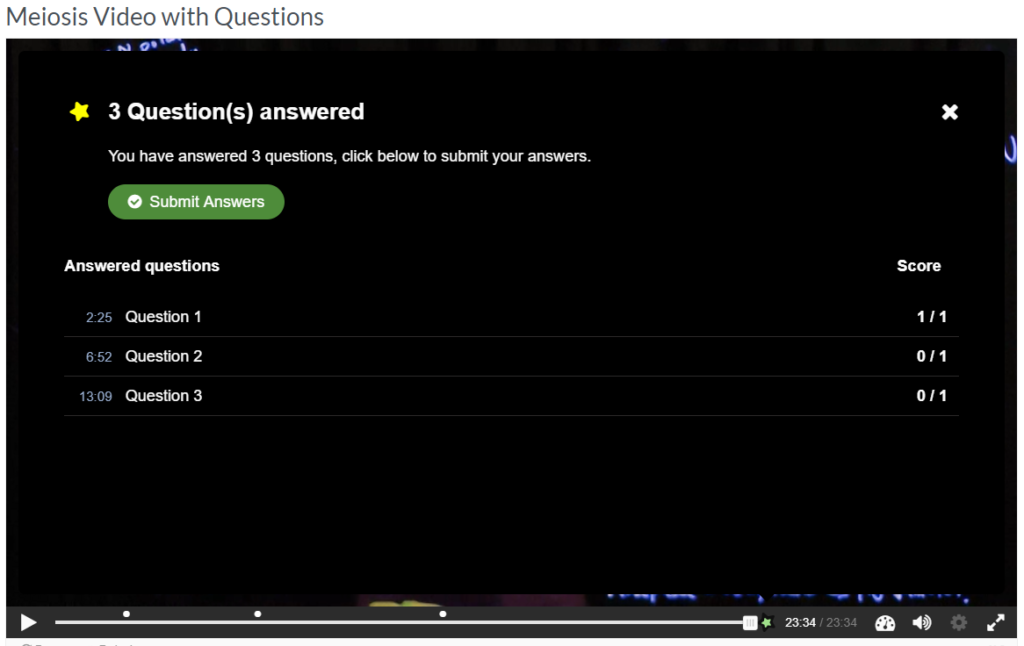
I recently discovered that there was an update for the H5P interactive video content type. After installing the update there was a change to how H5P passed grades to the Moodle gradebook. Based on my investigation I have been able to get the interactive video to pass grades successfully to the Moodle gradebook. The update requires that students click a submit button at some point in the video (figure 1). Instructors must configure when this button appears. My notes on how this may be done follow.
What the instructor needs to do
You will need to create a point in the video for the students to click a submit button. (instructions below)
What students need to do
Students will need to click a submit button (figure 1) in order for their grades to be passed back to the gradebook.
To add a Submit button
- Turn editing on
- Open the activity and then click Edit > Edit Settings
- Click on the “Interactions” section within the activity editor.
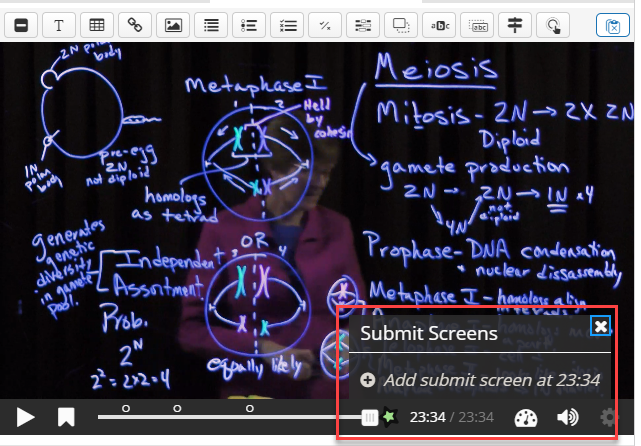
- Scrub to the point in the video you wish to place the submit button. If you want to encourage the students to watch the entire video I recommend placing this at the end.
- Click the ‘star” icon, then click the “+” icon to add a submit button (Figure 2)
Scroll to the bottom of the page and click the button to “Save changes and return to course.”
Options
The instructor may place the submit screen/button at any point in the video timeline. There are a couple places and reasons for placing the option.
- Right after the last question – Doing this ensures that the answers are recorded in the gradebook.
- At the end of the video – doing it this way may encourage students to view the entire video (is this is the instructors goal.
I don’t have a strong recommendation for either option. Choose the option that best aligns with your desired end, learning objection or outcome.
Moodle + Perusall

I am writing to let you know that we have integrated Perusall into Moodle. Perusall is a social, collaborative reading and annotation platform (video, 8:17). You can see an example of what Perusall looks like here.
You and your students can use this platform for free. The integration with Moodle allows seamless login from Moodle to Perusall and grade sync. Here is a brief video (0:31) describing what students may do on the platform.
In addition, a group of interested faculty met to learn about and discuss uses of Perusall. During the session Dr. Scott Corry shared how he used Perusall last Spring term. You may view the recorded session here (51:40, only available to Lawrence faculty and staff)
Connecting Perusall to your Moodle Course
You connect Perusall to your Moodle by creating a Perusall activity in your course. To do so:
- Turn editing on
- Click the “Add an activity or resource” link.
- Select the External Tool and click Add.
- Give the activity a name (“Perusall” should work.)
- Select “Perusall” from the Preconfigured tool drop-down menu.
- Scroll down and click the “Save and return to course” button.
Once you do this you should see the activity in your course. From here you can click the link to the activity. Doing so will create your Perusall course based on your Moodle course. You will notice that the Perusall course link will contain the Moodle course name. Once this is complete this activity should be hidden from students.
From here you can follow the prompts In Perusall to add materials to your Perusal course and create assignments.
- Follow this link for instructions for adding materials to your Perusall Library.
- Follow this link for instructions for creating an assignment in Perusall.
Creating a Perusall Assignment in Moodle
Adding Perusall assignments in Moodle creates the grade sync from Perusall to Moodle. Students should use the links for specific Perusall assignments. The instructions on this page in the “Setting up Assignments” section share instructions for creating a Perusall assignment in Moodle.
The steps for creating a Perusall assignment in Moodle are very similar to the steps for connecting Perusall to your Moodle course.
- Turn editing on
- Click the “Add an activity or resource” link.
- Select the External Tool and click Add.
- Paste in the assignment name copied from Perusall.
- Select “Perusall” from the Preconfigured tool drop-down menu.
- [Optional, if you use the Moodle gradebook and want grade sync] expand the Grade section and:
- Select Point for the Type.
- The Maximum grade may be left at 100.
- Select a grade category
- Grade to pass may be left alone.
- Scroll down and click the “Save and return to course” button.
You may be interested in learning more about how Perusall grades student annotations. This PDF contains information about how Perusall grades student annotations.
Recommendations
Trial Period
One recommendation that Dr. Corry mentioned was to allow yourself freedom and time to test the grading settings in Perusall to make sure that Perusall is functioning the way you wish.
Perusall is not just for documents
It is possible to import a video to Perusall and have students annotate the video. Students may watch the video and make comments as they watch. Comments will be timestamped to the video. Here are some instructions from Perusall about using video.
Moodle: Fall 2020, Student Access
Due to current circumstances, students will be encouraged to enroll in courses that they might wish to take. Once a student enrolls in a course they cannot unenroll themselves. This may create a scenario where students are enrolled in Moodle classes in which they will ultimately not participate. Each instructor can manage their enrollments in Moodle. An instructor may wish to prohibit other students from enrolling in their course after the add/drop deadline. This can be accomplished by setting a password for your course, which Moodle calls an enrollment key. Steps for unenrolling students and setting an enrollment key follow.
Unenrolling Students
Unenrolling students is straightforward in Moodle. Enrollments may be managed from the Participants page. The steps to do so follow.
1. Click Participants located in the Navigation block or Users > Enrolled Users located in the Administration block.
2. Click the Unenroll button located in the “Status” column.
3. Click the “Unenroll” button.

Add an Enrollment Key
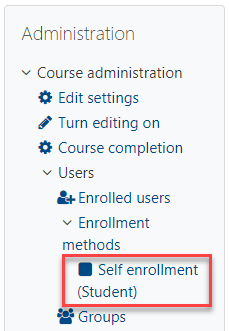
Once the add/drop deadline passes, you may want to prohibit other students from entering your Moodle course. The easiest way to do so is the an enrollment key. This is a password that students will need if they want to enroll in your course. Students who are already enrolled will not be affected. To set an enrollment key please follow the steps below.
1. Click Users > Enrollment Methods > Self Enrollment (Student) located in the Administration block.
2. Enter a password in the “Enrollment Key” field.
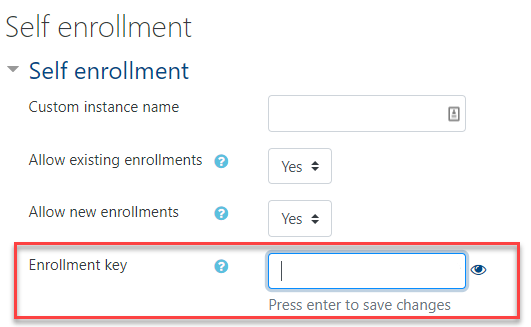
3. Scroll down and click the “Save changes” button.
The ability to unenroll students and prohibit unwanted students should provide the control you need for the coming term. Please feel free to contact me if you have questions about the details shared here.
Extreme Makeover: Moodle Edition
We are in unprecedented times. The spring term has been a time of triage, of doing what we can to meet students and create any learning experience possible. Many have used our learning management system, Moodle, for the first time (Kudos!) And some are relying on it just a bit more than they have before. According to data being collected by colleagues in the Office of Research Administration, student experience in this new paradigm within Moodle has varied. Some have been able to take it in stride and some have experienced challenges. The purpose of this post is to provide brief design examples and recommendations that an instructor may implement in their Moodle course to help make the student experience as good as it can be.
As an aside I will mention that Shannon Newman and I presented a workshop where we shared strategies for making a course more inclusive with Moodle tools. You may see the slides here.
What follows are some strategies with examples that you may choose to implement in your Moodle course(s).
Strategy 1 – Use Topic Zero With Care
The first topic section in every Moodle course is “Topic 0.” One special characteristic of this section is that it is always visible no matter which course format you choose.
This makes it a great place for more static information like a syllabus, office hours, and course description. Care should be taken to only place what is necessary in this section. Keeping the information in this section concise will limit how much the students have to scroll to access other course materials.
Strategy 2 – Use images
Images can bring color and increase interest on your course page. While cliché, there is some merit to the phrase, “A picture is worth 1000 words.” Used in the right way, an image can additionally help bring clarity to a concept or provide commentary on a specific idea. Below (1) is an example of a banner image from Martyn Smith’s RLST 205 course, “Religion and the Biosphere.” The image adds interest and is tied to the course theme.
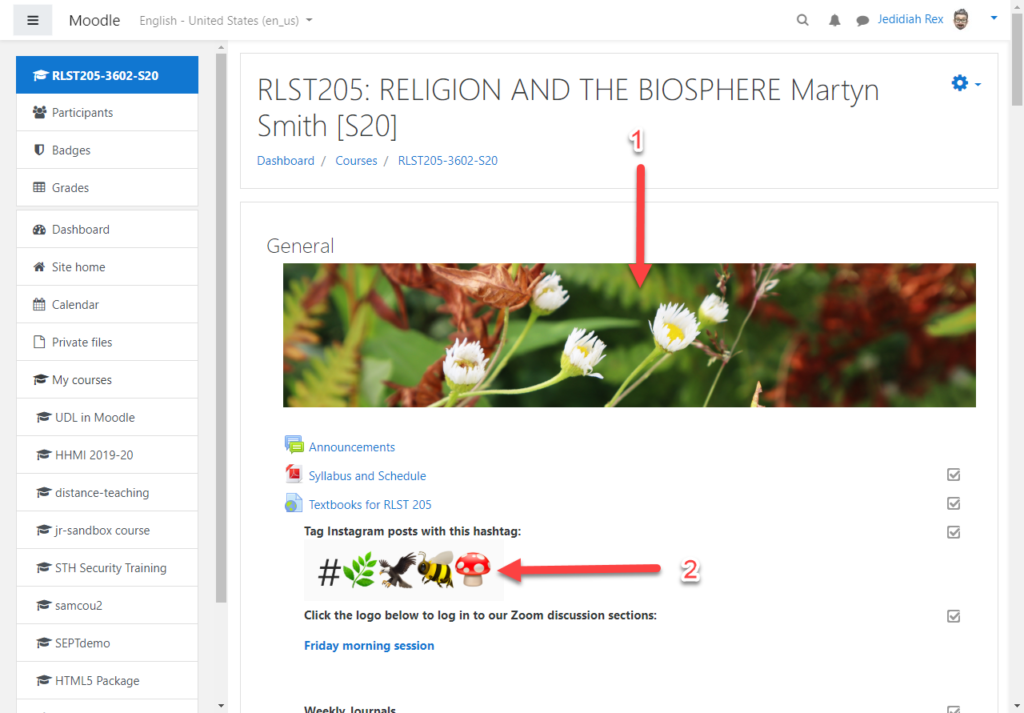
The second image (2) is used to convey information to the students about how they can interact in the course.
One note on using images: Best practice would dictate that all images be accessible, containing alternative text (alt text) where necessary. The Moodle text editor provides you direction for entering alt text and/or giving you the option to not include it if the image is decorative. In the above example the banner image is most likely decorative and doesn’t need alt text. The second image would require a description to allow those using screen reading software to know what the image was about.
Strategy 3 – Limit Cognitive Load
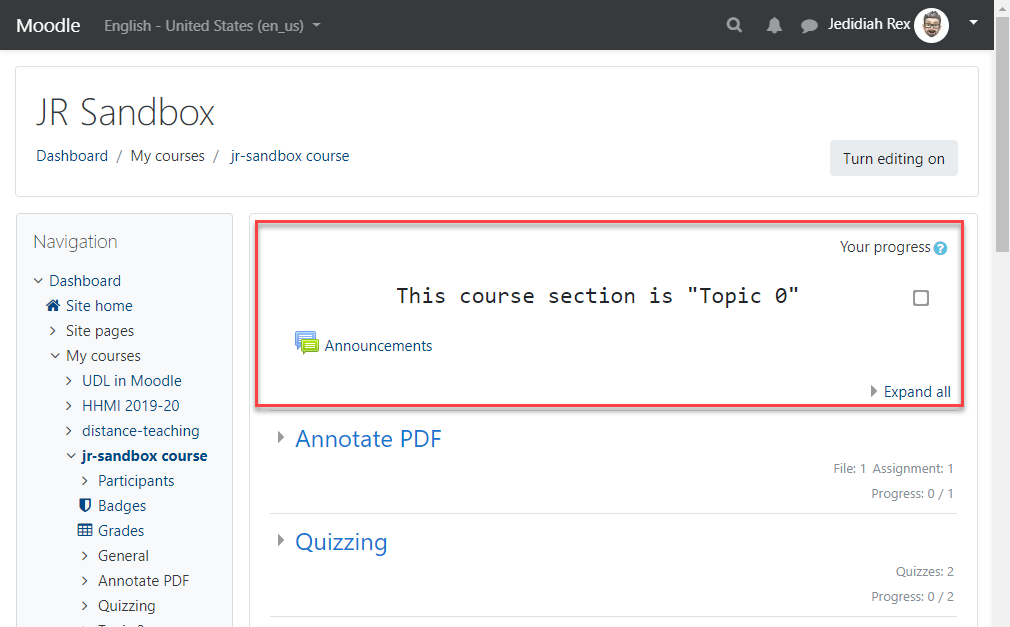
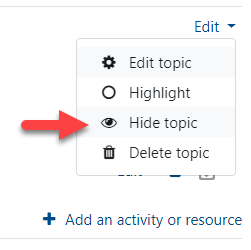
Limiting the amount of content that students must consume in an interaction with your course can open mental bandwidth for them to focus on the course content and work that you have for them. There are a number of ways that you can support students in this. One way exampled in both Martyn Smith’s RLST 205 and Shannon Newman’s BIOL 354 course, is that only the most current week/topic (RLST 205,) or all past and current are visible, but future topics are hidden (BIOL 354). Topic sections may easily be hidden by the instructor.
Activities and resources may also be hidden/shown to students based on a number of criteria including date, grade, completion of another activity or combination thereof.
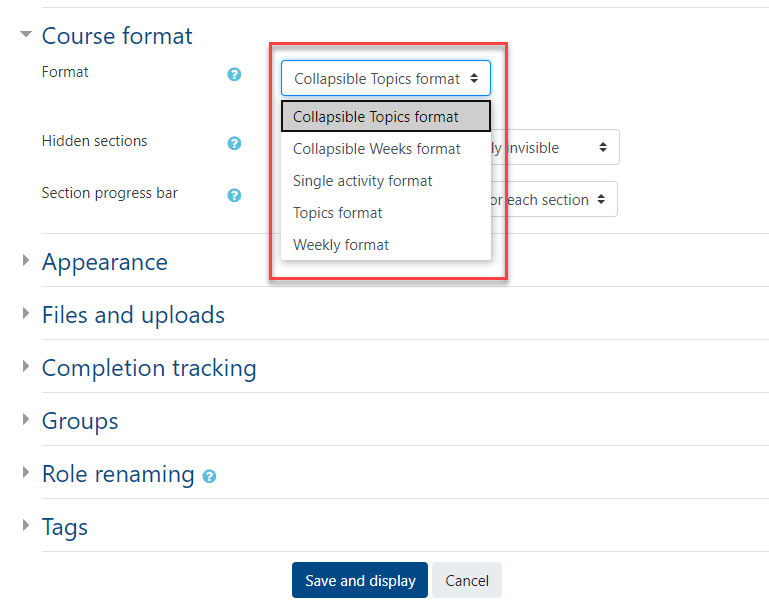
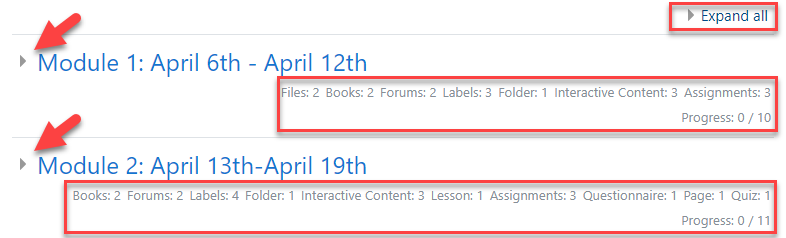
Another way to help focus students’ attention is to use an alternative course format. Two useful ones are collapsible topics or weeks. They function as they sound, allowing each topic to be collapsed or expanded as the student needs or desires.
We can see an example of this in the image below from Shannon Newman’s Molecular Biology course. There is an option to expand all sections in the upper right. Each section contains an arrow on the left to expand or collapse that section. Two benefits of this format are that 1) it provides a list of the activities and resources contained in that section, and 2) shows a progress counter so that students can see how much they have completed in a section. This supports their executive function.
One last way to limit cognitive overload is to group information within a Book, Page, or Folder resource. Each of these provide a way to consolidate large amounts of information or files into a single link on the course page.
Strategy 4 – Use Consistent Organization & Visual Design
A Moodle course is an extension of the class environment and in this current circumstance THE class environment. An instructor can provide context for the course materials which will in turn help students navigate, locate, and use those course materials. This is accomplished by using a consistent layout and visual design. An example of this can be seen in Shannon Newman’s Molecular Biology course.
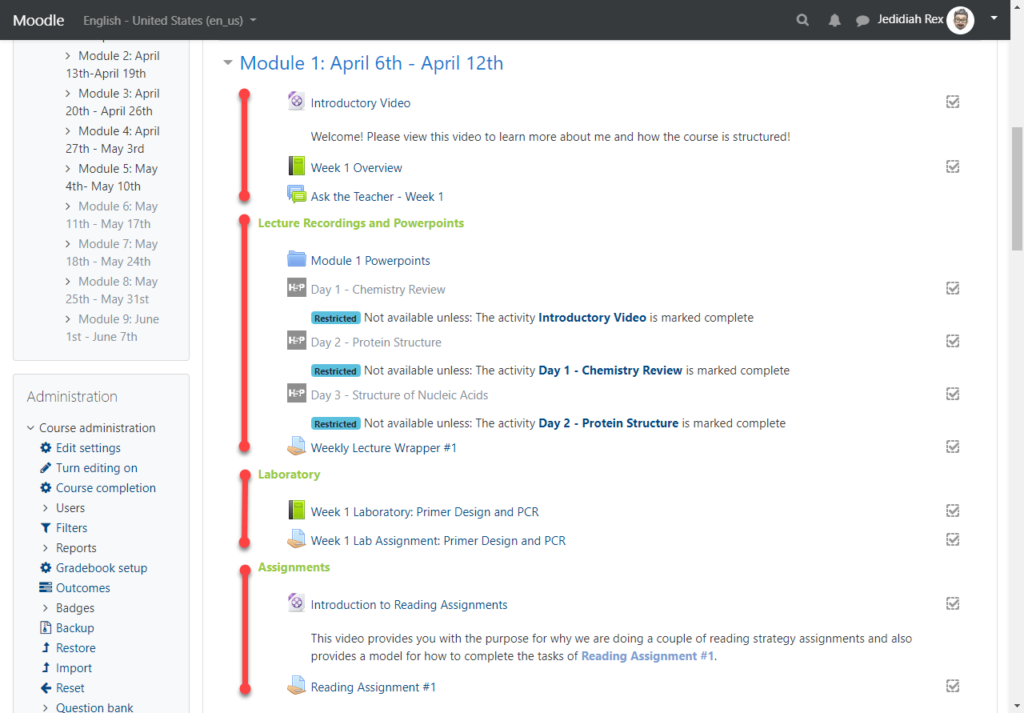
In the image above we see four distinct sections within the topic section: an overview, Lecture Recordings and PowerPoints, Laboratory, and Assignments. Each of the subsequent sections in Shannon’s course follow this same format. Doing so provides a consistent structure to help the students find what they need. Creating sub-sections within a topic section can be accomplished by using a Label resource to create a heading and then indenting (“Move right”) the items below the heading.
Where the section structure may differ from topic to topic with additional or less materials, e.g. there is an additional section for “Exam Information” in the second module of Shannon’s course, the order is kept consistent to allow the students to easily scan over the materials and find what they need.
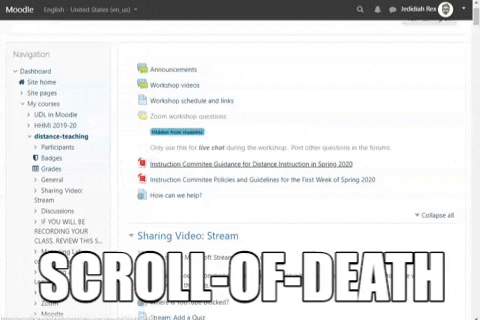
Strategy 5 – Avoid the Scroll-of-Death
Moodle makes it very easy to add materials to a course. It is simple as dragging them from your computer’s desktop or folder into your Moodle course. As a result a course can end up consisting of a long list of documents and activities requiring students to scroll and scroll to see materials later on in a course.
A number of the strategies mentioned above may help combat this (Collapsible topics/weeks, hiding topic sections, using Book, Page, or Folder resources.) Making an effort to limit scrolling is especially important as more and more users access Moodle from a mobile device. By way of illustration during the first four weeks of winter term 41% of users accessed Moodle from a mobile device. During the first four weeks of spring term this number has increased to 53%. Ignoring this trend means creating barriers for users and creating a less inclusive environment.
Using the handful of strategies presented can help make your course more accessible, pleasant, and useful to students. The easier it is for your students to navigate your Moodle course the more they can concentrate on the task of learning. Please reach out to Instructional Technology if you have any questions about the strategies shared here.