Back in August, Dana Rose-Schmaltz from Technology Services and I presented a Zoom: Basic how-to presentation video (6:43). We also wanted to present instructions on some more advanced features of Zoom and how to use them. Between the time we shared the basics video and now, Zoom has implemented some updates and security measures that we also want to make you aware. This post will serve to share information about those updates and a “how-to” around two advanced features – polling and breakout rooms. If you have any questions or run into any issues using Zoom (web portal, or desktop app) please contact the Lawrence University Helpdesk at 920-832-6570, or helpdesk@lawrence.edu.
Zoom Version
The first important thing for all of what follows is to make sure that we are all on the same page as far as the Zoom version. Everything shared in this post will pertain to the Zoom client (desktop app) version 5.2.2+.
Check for Updates
Checking to see which version of Zoom you have is straightforward. It should also be simple to update to the most recent version if you do not have it. The check your version and update if necessary:
- Open the Zoom desktop app.
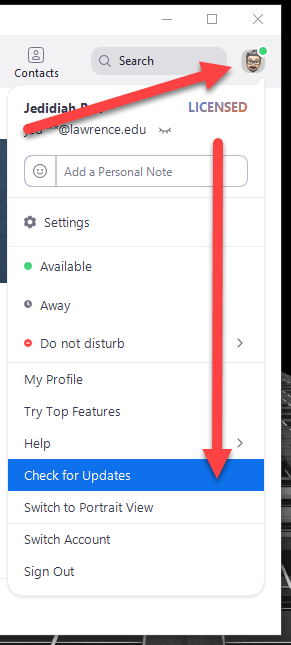
- Click your profile image / initials located in the upper right of the app window.
- Scroll to, and select “Check for updates.”
Check for Updates
Zoom will either present a message that you are using the current version or begin to download and install the most up-to-date version.
Note: if you run into any issues when updating Zoom please contact the Lawrence University Helpdesk at 920-832-6570, or helpdesk@lawrence.edu.
Hi-Fi Audio
One of the sought-after updates in this version (5.2.2) was a setting for “hi-fi” audio. This version allows a user to use “high-fidelity audio mode.” As described by Zoom, this mode, provides the operator options, “for disabling echo cancellation & post-processing, while raising audio codec quality to 48Khz, 96Kbps mono/192kbps stereo for professional audio transmission in music education and performance applications.” they do mention that this mode requires a professional audio interface, microphone, and headphones.
To enable the hi-fi audio settings:
- Open the Zoom desktop app.
- Click the settings gear icon located under your profile image in the upper-right corner.
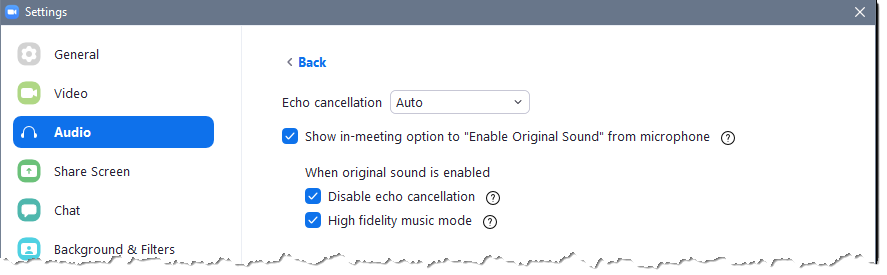
- Select Audio, and then click the Advanced button located in the lower-right corner.
- Select the check-box for “Show in-meeting option to ‘Enable Original Sound’ from microphone”
- Select both options under the “When original sound is enabled” setting. These disable echo cancellation and and enable “High fidelity music mode.”
Security Settings
Back in August, Dana shared with the that Zoom shared some impending security changes that would happen on September 27. I posted about it then. As it is close to that date, I want to re-share here.
After the 27th, any meeting created in Zoom will need to have either a passcode or waiting room applied. If a meeting is created without either of these, then the waiting room will be applied automatically.
Polling
Polling is one way in Zoom to replicate the face-to-face experience of student response systems, i.e. “clickers”. An instructor may use these to check for understanding, engage students in a new topic, provide opportunity for metacognitive reflection and more. Polls may be created in advance of a meeting or “on the fly,” in the meeting. Check here for instructions from Zoom about using Polling.
Some notes about poll creation:
- You must create a meeting, save it, and then re-open it to add polls.
- If you add polls during a Zoom meeting, you will be brought back to the Zoom web portal (lawrence.zoom.us) to do so.
Check out the video (2:15) below for a primer in using polling in Zoom.
Breakout Rooms
Another great pedagogical tool is Zoom is Breakout Rooms. This replicates the small group protocol in the face-to-face modality. These may be used for discussion, small group work, or think-pair-share activities. It is possible to create breakout rooms automatically, based on the number of participants in the meeting and the number of groups desired; or manually based on specific determination by the instructor. Which method you use may depend on your desired outcome. You can see Zoom’s video (3:18) on creating and using Breakout rooms below.
You can also find information here about managing your breakout rooms. There may be instances where a group is working on a project over multiple class meetings. In this case group consistency is imperative.
Importing Rooms and Participants by CSV
Creating breakout rooms manually each time could be a tedious, onerous task. Zoom makes it possible to create/assign breakout rooms ahead of time by uploading a CSV (comma separated value) file. There are some limitations to pre-assigning breakout rooms:
- You can only pre-assign participants that have a Zoom account (internal or external Zoom users).
- When pre-assigning participants using the web portal, you can only pre-assign internal Zoom users that are in the same account.
Note: We recommend that you direct all your students to create Zoom accounts at lawrence.zoom.us. If this has been done, make sure to use the students’ full LU email addresses. - To pre-assign participants that are external Zoom users, import a CSV file.
Note: You can still use the CSV method if the student has a non-LU account, you just need to make sure you have the email they used to create their Zoom account.
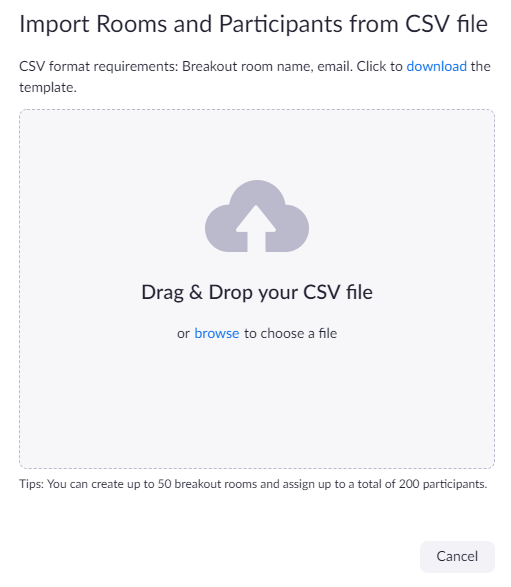
I have noticed that I have had stable success using the CSV method when I use the template CSV provided when I click to download the template linked in the “Import Rooms and Participants from CSV” window.
Note: if you run into any issues with this or other aspects of Zoom, please contact the Lawrence University Helpdesk at 920-832-6570, or helpdesk@lawrence.edu.
Bonus
If you are teaching in a space with a document camera* you can use it in Zoom as a webcam. Check out the video (2:12) here.
*This may not work with all document cameras. Check with Instructional Technology to see if your classroom has a document camera that will work.