As we prepare to teach in a flexible manner for the fall, one question that comes up is how to provide what may have been lecture in a face-to-face class, to what will be a distance/online class in the fall. It is possible to use Zoom and PowerPoint to record a video containing a slideshow and webcam.
The general order of operations to use Zoom to record a PowerPoint slideshow is:
- Open PowerPoint and have the presentation ready to show.
- Open the Zoom desktop app in the same space as the PowerPoint.
- Start the Zoom meeting, share the screen containing the PowerPoint window, begin recording.
- Start the PowerPoint slideshow.
- You should see yourself in a small window on top of the presentation. You can move, resize, and minimize this window.
- Proceed through the presentation. Adjust your video/webcam window as you need through the presentation, but try to minimize the amount of movement.
Note: You may want to format your slides to account for the webcam overly by leaving that area of the slides empty. Doing so will minimize how much you need to move the webcam overlay. - Close PowerPoint. End the screen share. Stop the recording and then leave the meeting. The video will begin to process/convert. Once it is complete a folder with the video will open.
The process looks like a lot written down, but it isn’t as challenging in practice as it might appear.
PowerPoint Settings
There are two settings you will want to address in the Slideshow settings/ribbon. Take note of the monitor PowerPoint will use. Make sure that this is the same as the screen you will share from Zoom. Deselect “Use Presenter View.”

Zoom Settings
These settings may be accessed from the Zoom desktop app by clicking the gear icon underneath your profile image in the upper-right corner of the app window. You will only have to set these once.
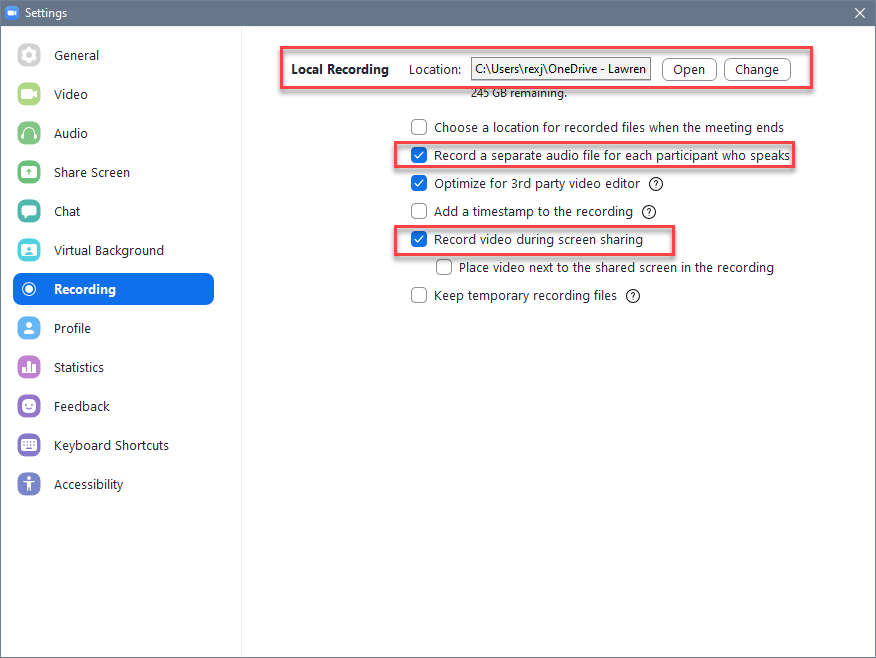
In the Recording settings you will want to make sure to that you:
- set a recording location
- select to record a separate audio file
- record video during screen sharing.
