Zoom: Advanced

Back in August, Dana Rose-Schmaltz from Technology Services and I presented a Zoom: Basic how-to presentation video (6:43). We also wanted to present instructions on some more advanced features of Zoom and how to use them. Between the time we shared the basics video and now, Zoom has implemented some updates and security measures that we also want to make you aware. This post will serve to share information about those updates and a “how-to” around two advanced features – polling and breakout rooms. If you have any questions or run into any issues using Zoom (web portal, or desktop app) please contact the Lawrence University Helpdesk at 920-832-6570, or helpdesk@lawrence.edu.

Zoom Version

The first important thing for all of what follows is to make sure that we are all on the same page as far as the Zoom version. Everything shared in this post will pertain to the Zoom client (desktop app) version 5.2.2+.

Check for Updates

Checking to see which version of Zoom you have is straightforward. It should also be simple to update to the most recent version if you do not have it. The check your version and update if necessary:

  1. Open the Zoom desktop app.
  2. Click your profile image / initials located in the upper right of the app window.
  3. Scroll to, and select “Check for updates.”
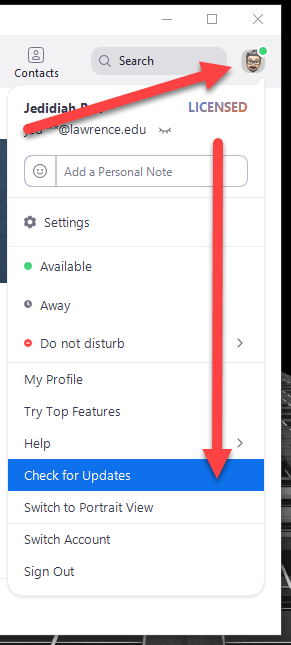
Zoom desktop app, checking for updates by clicking the profile image and then selecting, "Check for updates."
Zoom Desktop app:
Check for Updates

Zoom will either present a message that you are using the current version or begin to download and install the most up-to-date version.

Note: if you run into any issues when updating Zoom please contact the Lawrence University Helpdesk at 920-832-6570, or helpdesk@lawrence.edu.

Hi-Fi Audio

One of the sought-after updates in this version (5.2.2) was a setting for “hi-fi” audio. This version allows a user to use “high-fidelity audio mode.” As described by Zoom, this mode, provides the operator options, “for disabling echo cancellation & post-processing, while raising audio codec quality to 48Khz, 96Kbps mono/192kbps stereo for professional audio transmission in music education and performance applications.” they do mention that this mode requires a professional audio interface, microphone, and headphones.

To enable the hi-fi audio settings:

  1. Open the Zoom desktop app.
  2. Click the settings gear icon located under your profile image in the upper-right corner.
  3. Select Audio, and then click the Advanced button located in the lower-right corner.
  4. Select the check-box for “Show in-meeting option to ‘Enable Original Sound’ from microphone”
  5. Select both options under the “When original sound is enabled” setting. These disable echo cancellation and and enable “High fidelity music mode.”
Original sound settings in Zoom which provide high fidelity audio.
Zoom: High fidelity audio settings

Security Settings

Back in August, Dana shared with the that Zoom shared some impending security changes that would happen on September 27. I posted about it then. As it is close to that date, I want to re-share here.

After the 27th, any meeting created in Zoom will need to have either a passcode or waiting room applied. If a meeting is created without either of these, then the waiting room will be applied automatically.

Polling

Polling is one way in Zoom to replicate the face-to-face experience of student response systems, i.e. “clickers”. An instructor may use these to check for understanding, engage students in a new topic, provide opportunity for metacognitive reflection and more. Polls may be created in advance of a meeting or “on the fly,” in the meeting. Check here for instructions from Zoom about using Polling.

Some notes about poll creation:

  • You must create a meeting, save it, and then re-open it to add polls.
  • If you add polls during a Zoom meeting, you will be brought back to the Zoom web portal (lawrence.zoom.us) to do so.

Check out the video (2:15) below for a primer in using polling in Zoom.

https://youtu.be/erz4xtQHoVs
How to use Polling in Zoom.

Breakout Rooms

Another great pedagogical tool is Zoom is Breakout Rooms. This replicates the small group protocol in the face-to-face modality. These may be used for discussion, small group work, or think-pair-share activities. It is possible to create breakout rooms automatically, based on the number of participants in the meeting and the number of groups desired; or manually based on specific determination by the instructor. Which method you use may depend on your desired outcome. You can see Zoom’s video (3:18) on creating and using Breakout rooms below.

https://youtu.be/jbPpdyn16sY
How to create and use Breakout rooms.

You can also find information here about managing your breakout rooms. There may be instances where a group is working on a project over multiple class meetings. In this case group consistency is imperative.

Importing Rooms and Participants by CSV

Creating breakout rooms manually each time could be a tedious, onerous task. Zoom makes it possible to create/assign breakout rooms ahead of time by uploading a CSV (comma separated value) file. There are some limitations to pre-assigning breakout rooms:

  • You can only pre-assign participants that have a Zoom account (internal or external Zoom users).
  • When pre-assigning participants using the web portal, you can only pre-assign internal Zoom users that are in the same account.
    Note: We recommend that you direct all your students to create Zoom accounts at lawrence.zoom.us. If this has been done, make sure to use the students’ full LU email addresses.
  • To pre-assign participants that are external Zoom users, import a CSV file.
    Note: You can still use the CSV method if the student has a non-LU account, you just need to make sure you have the email they used to create their Zoom account.

I have noticed that I have had stable success using the CSV method when I use the template CSV provided when I click to download the template linked in the “Import Rooms and Participants from CSV” window.
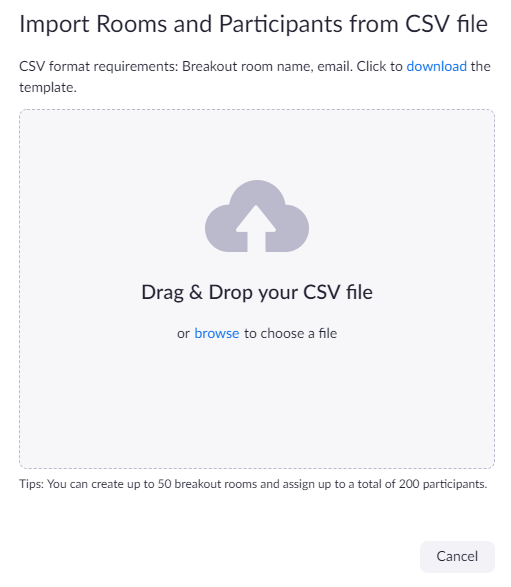
The drop-box area to import a CSV file.
“Import from CSV” window

Note: if you run into any issues with this or other aspects of Zoom, please contact the Lawrence University Helpdesk at 920-832-6570, or helpdesk@lawrence.edu.

Bonus

If you are teaching in a space with a document camera* you can use it in Zoom as a webcam. Check out the video (2:12) here.

*This may not work with all document cameras. Check with Instructional Technology to see if your classroom has a document camera that will work.

Moodle + Perusall

I am writing to let you know that we have integrated Perusall into Moodle. Perusall is a social, collaborative reading and annotation platform (video, 8:17). You can see an example of what Perusall looks like here.

You and your students can use this platform for free. The integration with Moodle allows seamless login from Moodle to Perusall and grade sync. Here is a brief video (0:31) describing what students may do on the platform.

In addition, a group of interested faculty met to learn about and discuss uses of Perusall. During the session Dr. Scott Corry shared how he used Perusall last Spring term. You may view the recorded session here (51:40, only available to Lawrence faculty and staff)

Connecting Perusall to your Moodle Course

You connect Perusall to your Moodle by creating a Perusall activity in your course. To do so:

  1. Turn editing on
  2. Click the “Add an activity or resource” link.
  3. Select the External Tool and click Add.
  4. Give the activity a name (“Perusall” should work.)
  5. Select “Perusall” from the Preconfigured tool drop-down menu.
  6. Scroll down and click the “Save and return to course” button.

Once you do this you should see the activity in your course. From here you can click the link to the activity. Doing so will create your Perusall course based on your Moodle course. You will notice that the Perusall course link will contain the Moodle course name. Once this is complete this activity should be hidden from students.

From here you can follow the prompts In Perusall to add materials to your Perusal course and create assignments.

Creating a Perusall Assignment in Moodle

Adding Perusall assignments in Moodle creates the grade sync from Perusall to Moodle. Students should use the links for specific Perusall assignments. The instructions on this page in the “Setting up Assignments” section share instructions for creating a Perusall assignment in Moodle.

The steps for creating a Perusall assignment in Moodle are very similar to the steps for connecting Perusall to your Moodle course.

  1. Turn editing on
  2. Click the “Add an activity or resource” link.
  3. Select the External Tool and click Add.
  4. Paste in the assignment name copied from Perusall.
  5. Select “Perusall” from the Preconfigured tool drop-down menu.
  6. [Optional, if you use the Moodle gradebook and want grade sync] expand the Grade section and:
    1. Select Point for the Type.
    2. The Maximum grade may be left at 100.
    3. Select a grade category
    4. Grade to pass may be left alone.
  7. Scroll down and click the “Save and return to course” button.

You may be interested in learning more about how Perusall grades student annotations. This PDF contains information about how Perusall grades student annotations.

Recommendations

Trial Period

One recommendation that Dr. Corry mentioned was to allow yourself freedom and time to test the grading settings in Perusall to make sure that Perusall is functioning the way you wish.

Perusall is not just for documents

It is possible to import a video to Perusall and have students annotate the video. Students may watch the video and make comments as they watch. Comments will be timestamped to the video. Here are some instructions from Perusall about using video.

Moodle: Fall 2020, Student Access

Due to current circumstances, students will be encouraged to enroll in courses that they might wish to take. Once a student enrolls in a course they cannot unenroll themselves. This may create a scenario where students are enrolled in Moodle classes in which they will ultimately not participate. Each instructor can manage their enrollments in Moodle. An instructor may wish to prohibit other students from enrolling in their course after the add/drop deadline. This can be accomplished by setting a password for your course, which Moodle calls an enrollment key. Steps for unenrolling students and setting an enrollment key follow.

Unenrolling Students

Unenrolling students is straightforward in Moodle. Enrollments may be managed from the Participants page. The steps to do so follow.

1. Click Participants located in the Navigation block or Users > Enrolled Users located in the Administration block.

2. Click the Unenroll button located in the “Status” column.

Moodle unenroll icon highlighted in a red box.

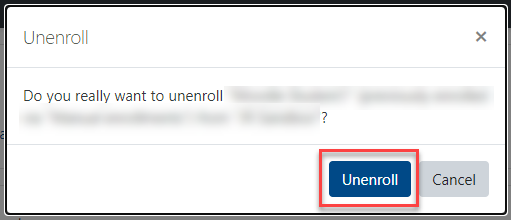
3. Click the “Unenroll” button.

Moodle unenroll button highlighted inside a red box.

Add an Enrollment Key

Once the add/drop deadline passes, you may want to prohibit other students from entering your Moodle course. The easiest way to do so is the an enrollment key. This is a password that students will need if they want to enroll in your course. Students who are already enrolled will not be affected. To set an enrollment key please follow the steps below.

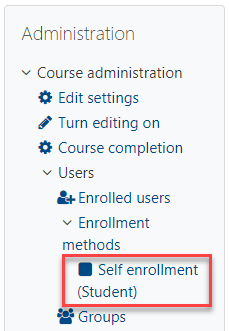
1. Click Users > Enrollment Methods > Self Enrollment (Student) located in the Administration block.

Course Administration menu with Self enrollment method highlighted in a red box.

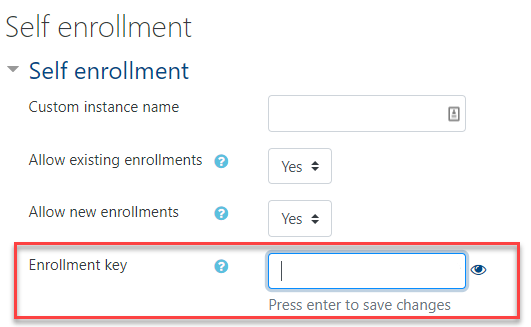
2. Enter a password in the “Enrollment Key” field.

Enter the course password into the enrollment key field.


3. Scroll down and click the “Save changes” button.

The ability to unenroll students and prohibit unwanted students should provide the control you need for the coming term. Please feel free to contact me if you have questions about the details shared here.

Community of Inquiry

In this Chronicle blog post, Rachel Toor writes about the strategies she used in conjunction with Zoom to help build community in her undergraduate courses. The main one about her, “sandbox” discussion thread reminded me about what I have learned from the community of inquiry method (CoI) and social presence. it is also encouraging to know that at least some face-to-face strategies may work in an online environment.

For more about Community of Inquiry (CoI) check out the links here: https://raindrop.io/collection/11425854

Zoom: Changes 9/27

In order to make video meetings as secure as possible Zoom will be implementing some changes to how meetings will be set up. In short a meeting will need to have either a passcode or waiting room enabled. if neither are configured then the waiting room will be applied.

The notice from Zoom:

Dear Valued Customer,

At Zoom customers are our number one priority, and we always strive to bring you the best, most secure video meeting experience in the industry.
As we have previously communicated, starting September 27th, 2020, we will be requiring that all meetings have a Passcode or Waiting Room enabled. We have designed these security measures to give you control over your meeting security options while keeping the join experience as frictionless as possible.

> For meetings that do not have either a Passcode or Waiting Room enabled by September 27th, Zoom will enable a Waiting Room for you.
> You can customize the Waiting Room experience so individuals within your account, or on an approved list of domains, can bypass the Waiting Room and directly join the meeting.
> You can find meetings that are scheduled without a Passcode or Waiting Rooms by pulling the following report.
> We have also improved our Waiting Room notifications so the meeting host can now receive a visual and auditory notification that an attendee has entered the Waiting Room.

For more details, including a comprehensive FAQ document, please visit our Support page. If you have additional questions, please reach out to your Customer Success Manager or our Support Team.

Team Zoom

Recording Slide Presentations in Zoom

As we prepare to teach in a flexible manner for the fall, one question that comes up is how to provide what may have been lecture in a face-to-face class, to what will be a distance/online class in the fall. It is possible to use Zoom and PowerPoint to record a video containing a slideshow and webcam.

The general order of operations to use Zoom to record a PowerPoint slideshow is:

  1. Open PowerPoint and have the presentation ready to show.
  2. Open the Zoom desktop app in the same space as the PowerPoint.
  3. Start the Zoom meeting, share the screen containing the PowerPoint window, begin recording.
  4. Start the PowerPoint slideshow.
  5. You should see yourself in a small window on top of the presentation. You can move, resize, and minimize this window.
  6. Proceed through the presentation. Adjust your video/webcam window as you need through the presentation, but try to minimize the amount of movement.

    Note: You may want to format your slides to account for the webcam overly by leaving that area of the slides empty. Doing so will minimize how much you need to move the webcam overlay.
  7. Close PowerPoint. End the screen share. Stop the recording and then leave the meeting. The video will begin to process/convert. Once it is complete a folder with the video will open.

The process looks like a lot written down, but it isn’t as challenging in practice as it might appear.

PowerPoint Settings

There are two settings you will want to address in the Slideshow settings/ribbon. Take note of the monitor PowerPoint will use. Make sure that this is the same as the screen you will share from Zoom. Deselect “Use Presenter View.”

PowerPoint Slideshow Ribbon. Monitor settings highlighted in red box. Presentation monitor selected. "Use presenter view" deselected.
PowerPoint: Zoom Recording Settings

Zoom Settings

These settings may be accessed from the Zoom desktop app by clicking the gear icon underneath your profile image in the upper-right corner of the app window. You will only have to set these once.

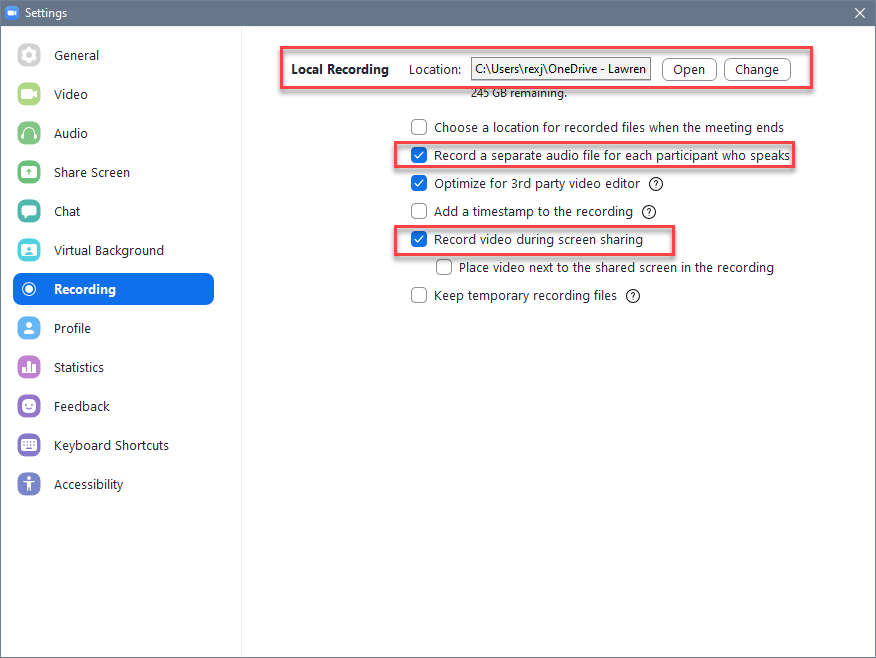
In the Recording settings you will want to make sure to that you:

  • set a recording location
  • select to record a separate audio file
  • record video during screen sharing.
Zoom recording preferences. Make sure to set a recording location. select "Record a separate audio for each participant," and "Record video during screen sharing."

Extreme Makeover: Moodle Edition

We are in unprecedented times. The spring term has been a time of triage, of doing what we can to meet students and create any learning experience possible. Many have used our learning management system, Moodle, for the first time (Kudos!) And some are relying on it just a bit more than they have before. According to data being collected by colleagues in the Office of Research Administration, student experience in this new paradigm within Moodle has varied. Some have been able to take it in stride and some have experienced challenges. The purpose of this post is to provide brief design examples and recommendations that an instructor may implement in their Moodle course to help make the student experience as good as it can be.

As an aside I will mention that Shannon Newman and I presented a workshop where we shared strategies for making a course more inclusive with Moodle tools. You may see the slides here.

What follows are some strategies with examples that you may choose to implement in your Moodle course(s).

Strategy 1 – Use Topic Zero With Care

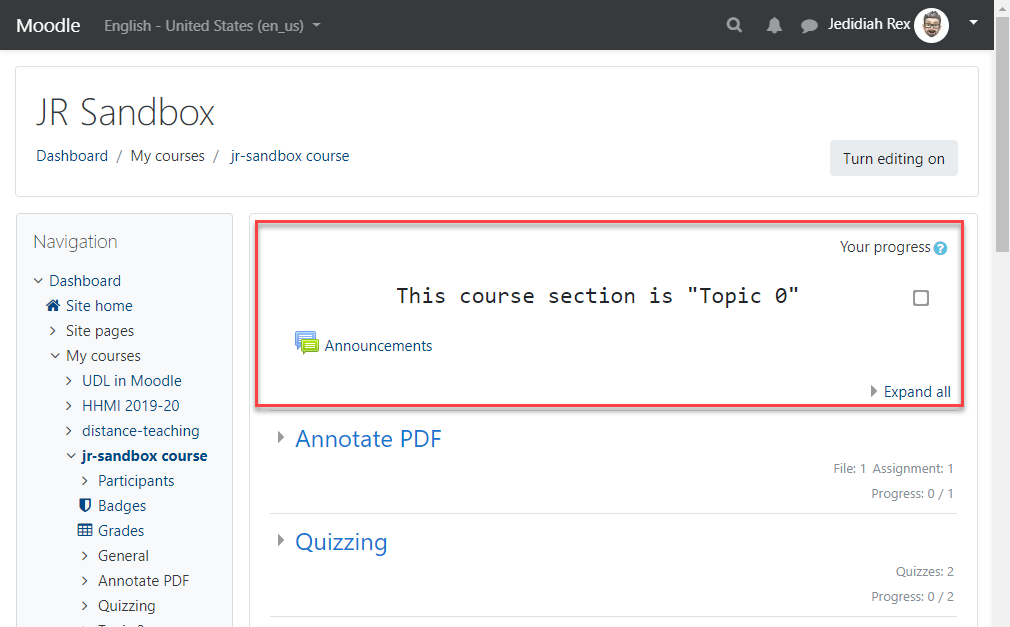
The first topic section in every Moodle course is “Topic 0.” One special characteristic of this section is that it is always visible no matter which course format you choose.

Moodle course page with the first topic section, "Topic Zero," highlighted inside a red box.
Moodle: Topic Zero

This makes it a great place for more static information like a syllabus, office hours, and course description. Care should be taken to only place what is necessary in this section. Keeping the information in this section concise will limit how much the students have to scroll to access other course materials.

Strategy 2 – Use images

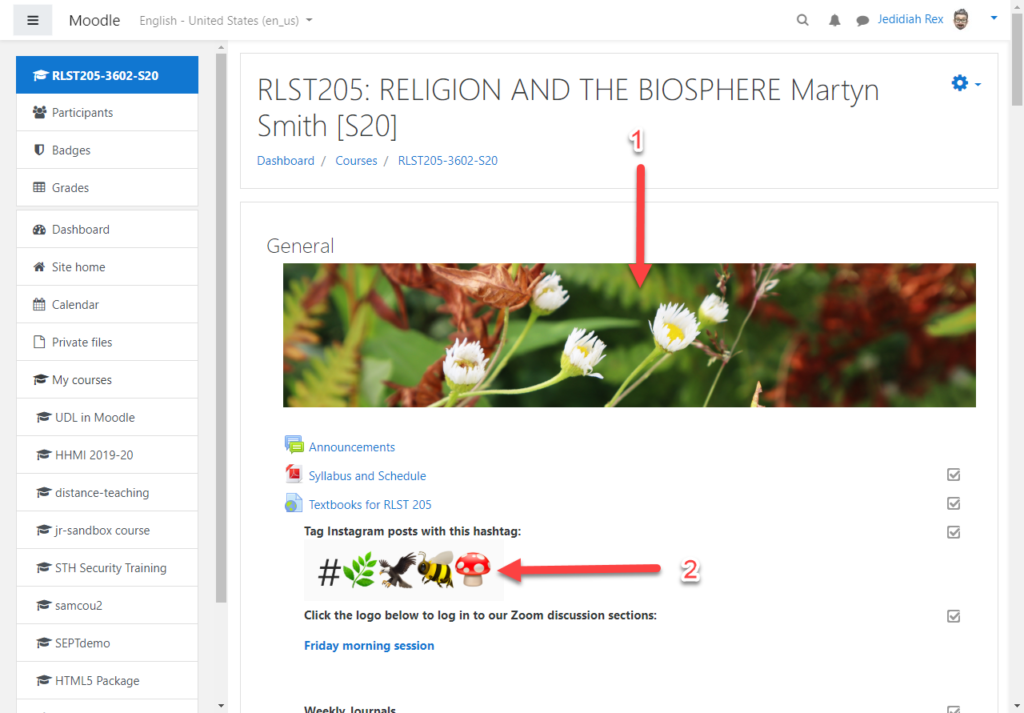
Images can bring color and increase interest on your course page. While cliché, there is some merit to the phrase, “A picture is worth 1000 words.” Used in the right way, an image can additionally help bring clarity to a concept or provide commentary on a specific idea. Below (1) is an example of a banner image from Martyn Smith’s RLST 205 course, “Religion and the Biosphere.” The image adds interest and is tied to the course theme.

A Moodle course page showing a banner image of white flowers in front of green leaves and a list of emoji images for students to use on Instragram.
RLST205S20: Images in a course.

The second image (2) is used to convey information to the students about how they can interact in the course.

One note on using images: Best practice would dictate that all images be accessible, containing alternative text (alt text) where necessary. The Moodle text editor provides you direction for entering alt text and/or giving you the option to not include it if the image is decorative. In the above example the banner image is most likely decorative and doesn’t need alt text. The second image would require a description to allow those using screen reading software to know what the image was about.

Strategy 3 – Limit Cognitive Load

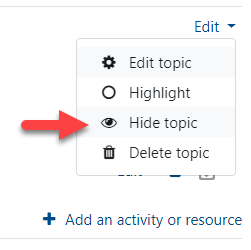
Limiting the amount of content that students must consume in an interaction with your course can open mental bandwidth for them to focus on the course content and work that you have for them. There are a number of ways that you can support students in this. One way exampled in both Martyn Smith’s RLST 205 and Shannon Newman’s BIOL 354 course, is that only the most current week/topic (RLST 205,) or all past and current are visible, but future topics are hidden (BIOL 354). Topic sections may easily be hidden by the instructor.

Moodle Edit topic settings menu with the "Hide topic" option noted with a red arrow.
Moodle: Edit topic menu.

Activities and resources may also be hidden/shown to students based on a number of criteria including date, grade, completion of another activity or combination thereof.

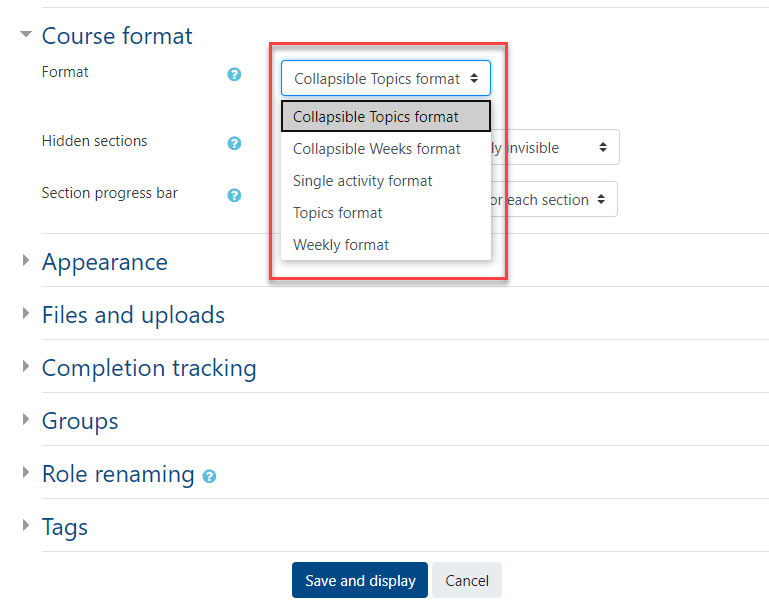
Another way to help focus students’ attention is to use an alternative course format. Two useful ones are collapsible topics or weeks. They function as they sound, allowing each topic to be collapsed or expanded as the student needs or desires.

The Moodle course settings page with the Course Format sections expanded and the Format drop-down menu expanded to show the available course formats. These include (in this order from top to bottom): Collapsible topics format, Collapsible Weeks format, Single activity format, Topics format, and Weekly format.
Moodle: Course Administration > Edit Settings > Course format.

We can see an example of this in the image below from Shannon Newman’s Molecular Biology course. There is an option to expand all sections in the upper right. Each section contains an arrow on the left to expand or collapse that section. Two benefits of this format are that 1) it provides a list of the activities and resources contained in that section, and 2) shows a progress counter so that students can see how much they have completed in a section. This supports their executive function.

BIOL354S20: Collapsible topic sections.

One last way to limit cognitive overload is to group information within a Book, Page, or Folder resource. Each of these provide a way to consolidate large amounts of information or files into a single link on the course page.

Strategy 4 – Use Consistent Organization & Visual Design

A Moodle course is an extension of the class environment and in this current circumstance THE class environment. An instructor can provide context for the course materials which will in turn help students navigate, locate, and use those course materials. This is accomplished by using a consistent layout and visual design. An example of this can be seen in Shannon Newman’s Molecular Biology course.

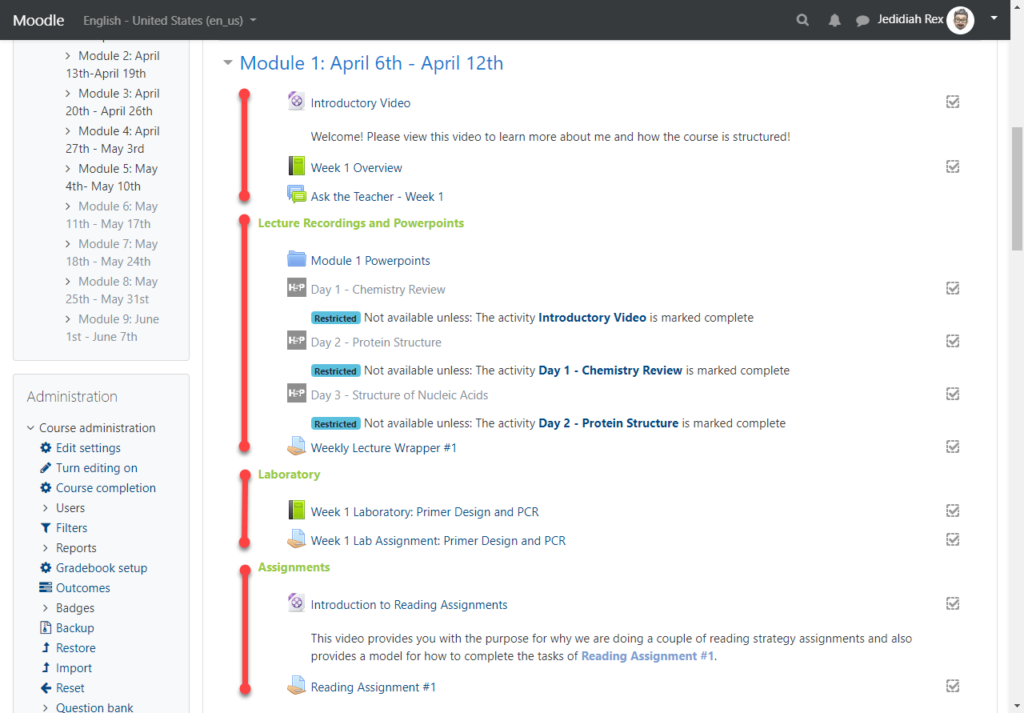
One topic section within a Moodle course page displaying four chunks of information: an overview, lecture recordings, laboratory, and assignments.
BIOL354S20: Consistent topic content layout and design.

In the image above we see four distinct sections within the topic section: an overview, Lecture Recordings and PowerPoints, Laboratory, and Assignments. Each of the subsequent sections in Shannon’s course follow this same format. Doing so provides a consistent structure to help the students find what they need. Creating sub-sections within a topic section can be accomplished by using a Label resource to create a heading and then indenting (“Move right”) the items below the heading.

Where the section structure may differ from topic to topic with additional or less materials, e.g. there is an additional section for “Exam Information” in the second module of Shannon’s course, the order is kept consistent to allow the students to easily scan over the materials and find what they need.

Strategy 5 – Avoid the Scroll-of-Death

Moodle makes it very easy to add materials to a course. It is simple as dragging them from your computer’s desktop or folder into your Moodle course. As a result a course can end up consisting of a long list of documents and activities requiring students to scroll and scroll to see materials later on in a course.

A scrolling Moodle page.

A number of the strategies mentioned above may help combat this (Collapsible topics/weeks, hiding topic sections, using Book, Page, or Folder resources.) Making an effort to limit scrolling is especially important as more and more users access Moodle from a mobile device. By way of illustration during the first four weeks of winter term 41% of users accessed Moodle from a mobile device. During the first four weeks of spring term this number has increased to 53%. Ignoring this trend means creating barriers for users and creating a less inclusive environment.

Using the handful of strategies presented can help make your course more accessible, pleasant, and useful to students. The easier it is for your students to navigate your Moodle course the more they can concentrate on the task of learning. Please reach out to Instructional Technology if you have any questions about the strategies shared here.

Workload Estimator

The Workload Estimator from the Center for Teaching Excellence at Rice University is a helpful tool for instructors to inform themselves about how much work they are giving students. This tool can be part of an instructors transparent approach by providing a way for instructors to communicate to students the amount of work that instructors require of students.

Making Accessible Office Documents

One part of creating an inclusive classroom is making sure that the materials we use are accessible to those with disabilities. As the University of Washington Accessible Technology blog points out, there are some common steps that one can take regardless of the type of document. These include:1

  • Using headings
  • Using lists
  • Using meaningful hyperlinks
  • Adding alternate text to images
  • Using tables wisely

I will include links below to helpful resources for each of the three Office tools. This link to the University of Washington page on creating accessible documents contain very helpful information. There is also a link to Microsoft’s accessibility video training hub that has helpful information and examples.

Word

PowerPoint

Excel

References

1. “Overview of Accessible Documents.” n.d. Accessible Technology (blog). Accessed February 20, 2020. https://www.washington.edu/accessibility/documents/overview/.

Lightboard!

The Lightboard, LU’s version of Learning Glass, is a way to engage students with lecture while maintaining eye contact with them. The current iteration supports recording of video that may be used in a flipped model. Instructional Technology invites any interested faculty to contact them about using the Lightboard.

Schedule a Demonstration

To schedule a demonstration of the capabilities of the Lightboard, please contact inst-tech@lawrence.edu.

Recording Tips

  • Plan to wear dark (not black) clothing so your writing will stand out better.
  • It may be helpful to practice on paper to position yourself correctly in relation to your writing.