I routinely receive updates for changes to various aspects of the Canvas platform. To make it easier for faculty to know what has changed I will be listing those changes/updates here. I will also note which roles (FacStaff, and/or Students) are affected by the change.
June 25, 2021
Gradebook Gradebook CSV Column Order
Summary: The Gradebook CSV assignment columns display in the same order as shown in the Gradebook for an individual user.
Affected User Roles: Instructors
When an instructor or other grader customizes the Gradebook assignment columns and downloads the CSV file, the CSV file assignment columns display in the same order as shown in the user’s Gradebook. Previously CSV files were always ordered by Assignment Group ID and Assignment Order.
Pages Mark as Done Button Placement
Summary: The Mark as Done button for students has been moved to the bottom of the page.
Affected User Roles: Students
When students are required to read a page and mark it as done, the Mark as Done button has been moved to the bottom of the page. The button can be marked more easily after students have reached the bottom of the page. Previously users must scroll back up to the top of the page to mark the page as done.
Moving course materials from Moodle to Canvas is fairly straightforward. The video below will help if you are interested in importing a course from Moodle to Canvas.
If you are interested in learning more about developing your course in Canvas there is a free opportunity coming up on June 17, 2021, 3:00-4:00 CDT. Our Canvas CSM team is facilitating a webinar titled, “Your Courses – From File Repository to Fabulous.”
Team-based learning is a well established active learning pedagogical strategy. I am aware of one instructor who is using team based learning at Lawrence. In his course he has students take a quiz individually, then the same quiz as a team. The second team based quiz allows multiple attempts but penalizes the students for each subsequent attempt. The purpose of this is to encourage students to discuss what the correct answer should be before submitting. He invited me and my supervisor to sit in on a class. It was amazing to see how much discussion happened in the breakout rooms. This approach works great in Zoom, and can be equally effective in face-to-face environments as well.
Canvas is currently developing a new quiz engine, New Quizzes. It is currently available in our instance of Canvas, but not the default quiz creation tool. It looks like New Quizzes will replace Classic Quiz in December 2022.
Canvas doesn’t currently support this quizzing behavior. One main mechanism to communicate with Instructure and effect change is the Community Forums. If you find this capability compelling and useful for you or other instructors, please add your voice to this community post.
Image Size recommendations (dimensions are approximate)
Banner image: 1451×312
Topic heading image: 88×88
For images in a grid-like pattern: make sure they are all the same dimensions so that the table cells are all the same size and images center the same within the cells
Emojipedia: https://emojipedia.org/ – Use this to add images to module titles, assignment titles, or any place you can enter text.
I recently came across this video tutorial below showing how you can use PowerPoint to create engaging animated videos (yes, really). As the video illustrates, it is possible to create some fun, engaging, and impressive animated videos with only the tools and resources built-in to PowerPoint.
This video provides a good idea for a digital project you might have students create in lieu of another assignment format. The video also highlights some free resources that may be good for you or your students to use in the creation of other digital projects.
This post will be used to host links to all the Moodle workshop, support videos, and links. Links will be grouped as best as possible by topic. If there is a Moodle support topic you would like to request, please contact Jedidiah Rex.
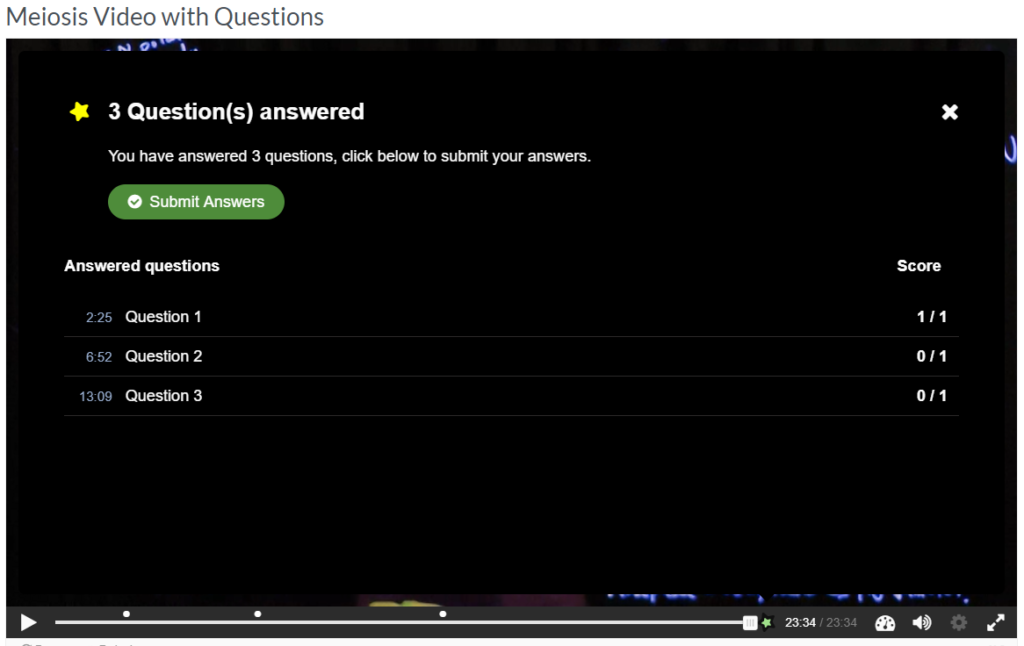
I recently discovered that there was an update for the H5P interactive video content type. After installing the update there was a change to how H5P passed grades to the Moodle gradebook. Based on my investigation I have been able to get the interactive video to pass grades successfully to the Moodle gradebook. The update requires that students click a submit button at some point in the video (figure 1). Instructors must configure when this button appears. My notes on how this may be done follow.
Figure 1: H5P Interactive video submit answers button.
What the instructor needs to do
You will need to create a point in the video for the students to click a submit button. (instructions below)
What students need to do
Students will need to click a submit button (figure 1) in order for their grades to be passed back to the gradebook.
To add a Submit button
Turn editing on
Open the activity and then click Edit > Edit Settings
Click on the “Interactions” section within the activity editor.
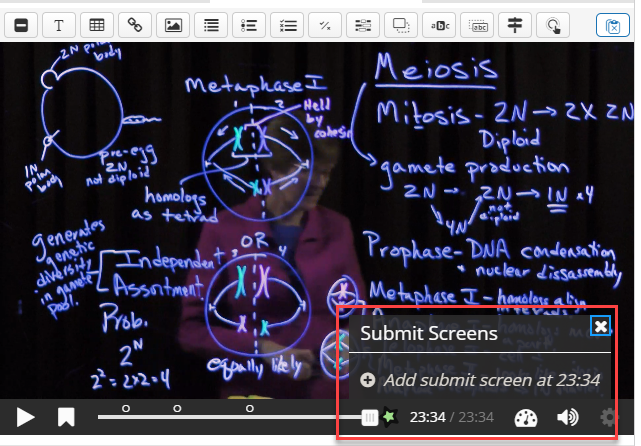
Scrub to the point in the video you wish to place the submit button. If you want to encourage the students to watch the entire video I recommend placing this at the end.
Click the ‘star” icon, then click the “+” icon to add a submit button (Figure 2) Scroll to the bottom of the page and click the button to “Save changes and return to course.”
Figure2: Star icon to place Submit button.
Options
The instructor may place the submit screen/button at any point in the video timeline. There are a couple places and reasons for placing the option.
Right after the last question – Doing this ensures that the answers are recorded in the gradebook.
At the end of the video – doing it this way may encourage students to view the entire video (is this is the instructors goal.
I don’t have a strong recommendation for either option. Choose the option that best aligns with your desired end, learning objection or outcome.
Back in August, Dana Rose-Schmaltz from Technology Services and I presented a Zoom: Basic how-to presentation video (6:43). We also wanted to present instructions on some more advanced features of Zoom and how to use them. Between the time we shared the basics video and now, Zoom has implemented some updates and security measures that we also want to make you aware. This post will serve to share information about those updates and a “how-to” around two advanced features – polling and breakout rooms. If you have any questions or run into any issues using Zoom (web portal, or desktop app) please contact the Lawrence University Helpdesk at 920-832-6570, or helpdesk@lawrence.edu.
Zoom Version
The first important thing for all of what follows is to make sure that we are all on the same page as far as the Zoom version. Everything shared in this post will pertain to the Zoom client (desktop app) version 5.2.2+.
Check for Updates
Checking to see which version of Zoom you have is straightforward. It should also be simple to update to the most recent version if you do not have it. The check your version and update if necessary:
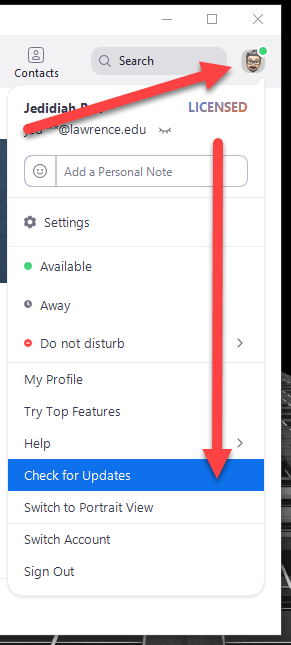
Open the Zoom desktop app.
Click your profile image / initials located in the upper right of the app window.
Scroll to, and select “Check for updates.”
Zoom Desktop app: Check for Updates
Zoom will either present a message that you are using the current version or begin to download and install the most up-to-date version.
Note: if you run into any issues when updating Zoom please contact the Lawrence University Helpdesk at 920-832-6570, or helpdesk@lawrence.edu.
Hi-Fi Audio
One of the sought-after updates in this version (5.2.2) was a setting for “hi-fi” audio. This version allows a user to use “high-fidelity audio mode.” As described by Zoom, this mode, provides the operator options, “for disabling echo cancellation & post-processing, while raising audio codec quality to 48Khz, 96Kbps mono/192kbps stereo for professional audio transmission in music education and performance applications.” they do mention that this mode requires a professional audio interface, microphone, and headphones.
To enable the hi-fi audio settings:
Open the Zoom desktop app.
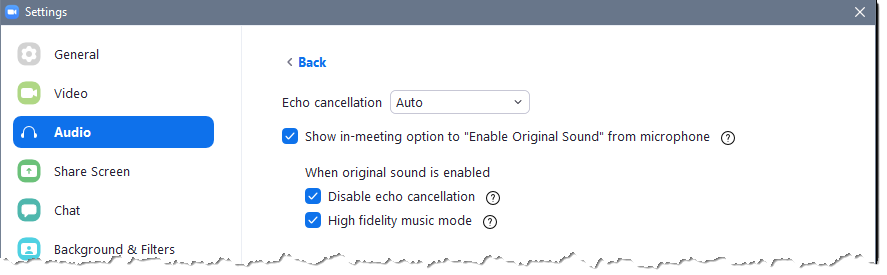
Click the settings gear icon located under your profile image in the upper-right corner.
Select Audio, and then click the Advanced button located in the lower-right corner.
Select the check-box for “Show in-meeting option to ‘Enable Original Sound’ from microphone”
Select both options under the “When original sound is enabled” setting. These disable echo cancellation and and enable “High fidelity music mode.”
Zoom: High fidelity audio settings
Security Settings
Back in August, Dana shared with the that Zoom shared some impending security changes that would happen on September 27. I posted about it then. As it is close to that date, I want to re-share here.
After the 27th, any meeting created in Zoom will need to have either a passcode or waiting room applied. If a meeting is created without either of these, then the waiting room will be applied automatically.
Polling
Polling is one way in Zoom to replicate the face-to-face experience of student response systems, i.e. “clickers”. An instructor may use these to check for understanding, engage students in a new topic, provide opportunity for metacognitive reflection and more. Polls may be created in advance of a meeting or “on the fly,” in the meeting. Check here for instructions from Zoom about using Polling.
Some notes about poll creation:
You must create a meeting, save it, and then re-open it to add polls.
If you add polls during a Zoom meeting, you will be brought back to the Zoom web portal (lawrence.zoom.us) to do so.
Check out the video (2:15) below for a primer in using polling in Zoom.
https://youtu.be/erz4xtQHoVs
How to use Polling in Zoom.
Breakout Rooms
Another great pedagogical tool is Zoom is Breakout Rooms. This replicates the small group protocol in the face-to-face modality. These may be used for discussion, small group work, or think-pair-share activities. It is possible to create breakout rooms automatically, based on the number of participants in the meeting and the number of groups desired; or manually based on specific determination by the instructor. Which method you use may depend on your desired outcome. You can see Zoom’s video (3:18) on creating and using Breakout rooms below.
You can only pre-assign participants that have a Zoom account (internal or external Zoom users).
When pre-assigning participants using the web portal, you can only pre-assign internal Zoom users that are in the same account. Note:We recommend that you direct all your students to create Zoom accounts at lawrence.zoom.us.If this has been done, make sure to use the students’ full LU email addresses.
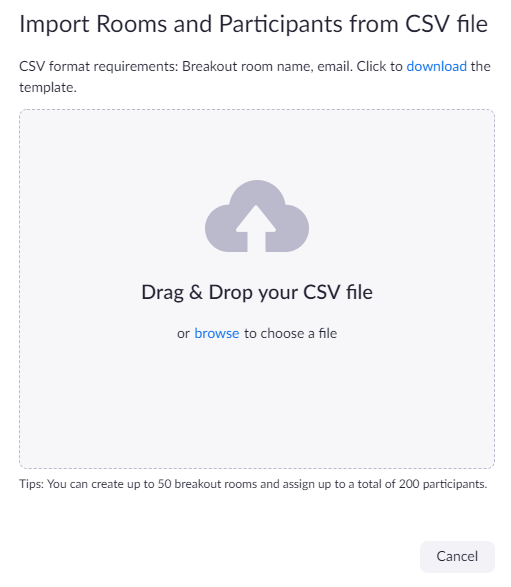
To pre-assign participants that are external Zoom users, import a CSV file. Note: You can still use the CSV method if the student has a non-LU account, you just need to make sure you have the email they used to create their Zoom account.
I have noticed that I have had stable success using the CSV method when I use the template CSV provided when I click to download the template linked in the “Import Rooms and Participants from CSV” window.
“Import from CSV” window
Note: if you run into any issues with this or other aspects of Zoom, please contact the Lawrence University Helpdesk at 920-832-6570, or helpdesk@lawrence.edu.
You and your students can use this platform for free. The integration with Moodle allows seamless login from Moodle to Perusall and grade sync. Here is a brief video (0:31) describing what students may do on the platform.
In addition, a group of interested faculty met to learn about and discuss uses of Perusall. During the session Dr. Scott Corry shared how he used Perusall last Spring term. You may view the recorded session here (51:40, only available to Lawrence faculty and staff)
Connecting Perusall to your Moodle Course
You connect Perusall to your Moodle by creating a Perusall activity in your course. To do so:
Turn editing on
Click the “Add an activity or resource” link.
Select the External Tool and click Add.
Give the activity a name (“Perusall” should work.)
Select “Perusall” from the Preconfigured tool drop-down menu.
Scroll down and click the “Save and return to course” button.
Once you do this you should see the activity in your course. From here you can click the link to the activity. Doing so will create your Perusall course based on your Moodle course. You will notice that the Perusall course link will contain the Moodle course name. Once this is complete this activity should be hidden from students.
From here you can follow the prompts In Perusall to add materials to your Perusal course and create assignments.
Adding Perusall assignments in Moodle creates the grade sync from Perusall to Moodle. Students should use the links for specific Perusall assignments. The instructions on this page in the “Setting up Assignments” section share instructions for creating a Perusall assignment in Moodle.
The steps for creating a Perusall assignment in Moodle are very similar to the steps for connecting Perusall to your Moodle course.
Turn editing on
Click the “Add an activity or resource” link.
Select the External Tool and click Add.
Paste in the assignment name copied from Perusall.
Select “Perusall” from the Preconfigured tool drop-down menu.
[Optional, if you use the Moodle gradebook and want grade sync] expand the Grade section and:
Select Point for the Type.
The Maximum grade may be left at 100.
Select a grade category
Grade to pass may be left alone.
Scroll down and click the “Save and return to course” button.
One recommendation that Dr. Corry mentioned was to allow yourself freedom and time to test the grading settings in Perusall to make sure that Perusall is functioning the way you wish.
Perusall is not just for documents
It is possible to import a video to Perusall and have students annotate the video. Students may watch the video and make comments as they watch. Comments will be timestamped to the video. Here are some instructions from Perusall about using video.