Notetaking to Understand and Create

This post is a companion to the demonstration I offered during the “CRITICAL
CONVERSATIONS AND PRACTICES SERIES : READING AT LU:
MINI – CONFERENCE,” on February 9, 2023
about using Zotero and Obsidian.

Why? I was in search of a way to efficiently capture notes that would help me think about what I read and make connections between ideas. I needed a personal knowledge management system, or PKM. I had been using OneNote for my notes, but felt limited by the hierarchical structure. OneNote has a search function but the way things are organized made it more difficult to make connections between ideas.

The Zettlekasten method, created by a German sociologist Niklaus Luhman, provides a workflow for taking in information and making connections between your ideas. The Zettlekasten means slip boxes. The zettlekasten workflow consists of taking fleeting notes, putting those into your own words as literature notes, and then taking those and turning them into new ideas as permanent notes. Luhman used a system of numbered cards to catalog his thoughts and ideas. It was this system that helped him be very prolific, publishing more than 70 books and 400 scholarly articles.

The system that Luhman created is made easier to implement now that we have computers. We have the ability to take what were physical cards (Luhman had roughly 90,000) and store them easily in a digital file system. There are a number of tools to do this, of which Obsidian is one. Obsidian is a non-linear notetaking system allowing you to make and see (important) connections between ideas. Obsidian uses markdown to efficiently format your notes. Using markdown makes it easy to link between notes. Entering two square brackets allows me to easily link to other pages. Obsidian shows me the links between items so that I can follow my train of thought.

Workflow

  1. Gather Fleeting Notes
  2. Process Fleeting notes into permanent notes and MAKE CONNECTIONS!

Moving Notes from Zotero to Obsidian

  1. Collect items/PDFs in Zotero – web clipper, DOI, etc.
  2. Read and annotate in Zotero (Fleeting notes)
  3. Right-Click on the item title in Zotero and Extract Annotations. Hide colors, hide citations.
  4. Copy item title.
  5. Right-click on note and export the note. Select Markdown format. Select “Include Zotero links.” Save in Obsidian Vault (paste in item title and date into file name.)
  6. Think about notes and make connections in Obsidian (Permanent Notes)

Capturing webpages as PDFs into Zotero

  1. Install Zutilo Zotero add-on.
  2. Add keyboard shortcut for attaching a new file. CTRL+P recommended.
  3. Open browser to page you want to collect.
  4. Press CTRL+P to Save as PDF.
  5. Navigate to and select item in Zotero.
  6. Press CTRL+P to attach PDF to item.

Resources

Glossary

PKM – personal knowledge management https://en.wikipedia.org/wiki/Personal_knowledge_management

Apps

Obsidian – non-linear/heirarchical notetaking tool https://obsidian.md/
Zotero – Citation manager, reading and annotation tool https://www.zotero.org/

Videos

First video: The FUN and EFFICIENT note-taking System: https://youtu.be/L9SLlxaEEXY
How the Zotero 6 update changed my workflow: https://youtu.be/x0jtbmQnwmw
Zettelkasten Smart Notes: Step by Step with Obsidian: https://youtu.be/ziE6UExsOrs

Websites

How to capture webpages as PDFs into Zotero: https://www.nistu.de/posts/how-to-store-web-page-snapshots-as-pdf-in-zotero/
Zettlekasten – https://zettelkasten.de/introduction/ ; https://en.wikipedia.org/wiki/Zettelkasten
Niklas Luhman – https://en.wikipedia.org/wiki/Niklas_Luhmann
Linking Your Thinking – Nick Milo https://www.linkingyourthinking.com/

Workshop: Create a Canvas Course Home Page

Do you want to create a visually dynamic course home page?
Do you want more design flexibility?

If so, you are invited to participate Create a Canvas Course Home Page workshop. In this hands-on workshop, participants will be guided through a set of steps that can be used to develop their own home page. 

The session date/time/location is:

Thursday, October 20
10:30 a.m. – 12:00 p.m.
Humanities Lab, Main Hall 108.

Please RSVP here and contact Jedidiah with any questions.

Canvas: Create a Course Home Page

Do you want to create a visually dynamic course home page?
Do you want more design flexibility?

If so, you are invited to participate in one of two workshops to create a Canvas course homepage. This will be a hands-on workshop. Participants will be guided through a set of steps that can be used to develop their own home page. 

There will be two sessions. The same content will be presented in both. The session dates/time are:

  • Tuesday, September 27, 10:30 a.m. – 12:00 p.m.
  • Wednesday, September 28, 1:00 p.m. – 2:30 p.m.

Both sessions will be held in the Humanities Lab, Main Hall 108.

Please contact Jedidiah with any questions, or if you are interested in the topic, but unable to attend.

Canvas: Pages Plus

I had the opportunity to facilitate a workshop focused on a couple more advanced page editing options. We investigated how to create responsive tiles and creating tabbed pages. The purpose of these options is to create a visually engaging, responsive, and accessible page. The code to create tabs is based on what I found on this page. The code to create the responsive tiles was created through experimentation based on information gathered across many pages and forums.

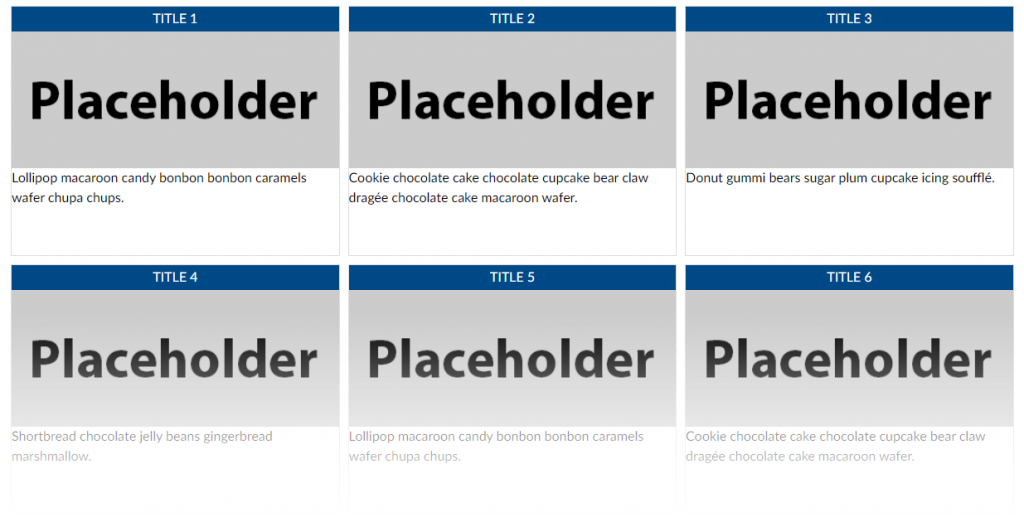
Six rectangular tiles arranged in two rows of three. Each has a title with white text and blue background. Below each title is a grey card containing the text "Placeholder." This is followed by filler text.
Tile/Button example.
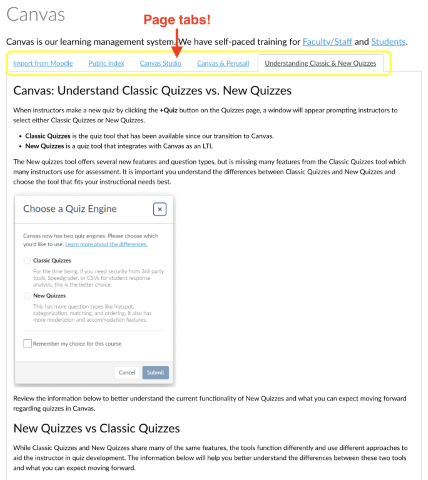
A Canvas Page containing tabs for different content on each tab.
Tabbed page example.

Code Examples

A snippet of the tiles HTML code for the tiles/buttons is below. I have separated each element with a line break to see each more clearly. This is followed by an explanation of what each piece is doing.

<div id="container">

    <div id="button1" style="width: 32%; height: 300px; float: left; min-width: 300px; margin-right: 10px; margin-bottom: 10px; padding: 0px; border: 1px solid #dddddd;">

        <h2 style="width: 100%; background-color: #004987; margin: 0px; padding: 3px 0px; font-size: 1em; text-align: center; color: #ffffff;">TITLE 1</h2>

		<p style="margin: 0px; padding: 0px;"><img id="315178" style="width: 100%; display: block; margin-left: auto; margin-right: auto;" src="https://lawrence.instructure.com/courses/3249/files/315178/preview" alt="placeholder_360x150.png" data-api-endpoint="https://lawrence.instructure.com/api/v1/courses/3249/files/315178" data-api-returntype="File" /></p>
      
		<p style="margin: 0px; padding: 0px;">Lollipop macaroon candy bonbon bonbon caramels wafer chupa chups.</p>
	</div>

 </div>

The first div serves as a container for all of the tiles or buttons, which are each their own div. The id allows us to give each div a name as a reminder of its function.

Each tile or button uses the same structure:
div – an opening div tag to define the button structure.
h2 – a heading to contain the button title.
p – a paragraph to contain an image.
p – a paragraph to contain a link and/or description for the button destination.
div – a closing div tag.

The width of the div is set as a percentage of the total page width. You can change this based on how many buttons you want to be tiled horizontally based on the overall page width. You can edit the height as you need/want. The min-width, margin-right, and margin-bottom allow the divs to tile correctly as the page becomes smaller (or on mobile). I recommend leaving these as they are. You can elimiate the border if you want by setting the width to “0px”. You can also change the color of the border if you want by entering a different HEX color code.

The h2 creates a heading for the button. You can remove this line if you do not want it. You can edit the background and/or text color by changing the HEX color code for the “background-color” and/or “color” element.

The first paragraph tag contains the button image. The “p style” allows the full image to be displayed without any space between it and the h2 heading. The image styling (display: block; margin-left: auto; margin-right: auto;) centers the image in the paragraph.

This last paragraph contains the link to a page or other course element. The “text-align: center” style centers the text in the paragraph.

These are followed by each of the closing div tags.

Let’s turn to the tabbed pages. Here is the code:

<div class="enhanceable_content tabs">

<ul>
<li><a href="#fragment-1">PUT TITLE FOR TAB HERE</a></li>
<li><a href="#fragment-2">PUT TITLE FOR TAB HERE</a></li>
<li><a href="#fragment-3">PUT TITLE FOR TAB HERE</a></li>
</ul>


<div id="fragment-1">PUT THE CONTENT FOR THE FIRST TAB HERE</div>
<div id="fragment-2">PUT THE CONTENT FOR THE SECOND TAB HERE.</div>
<div id="fragment-3">PUT THE CONTENT FOR THE THIRD TAB HERE</div>

</div>

Make sure to edit the tab titles in HTML mode and not in the rich content editor. Doing the latter may introduce display issues with your page. You can add more tabs by copying and renaming each list (li) item. Make sure you copy from the opening li tag through the closing li tag. You will also need to make sure to add a corresponding content area.

Recommended workflow – create separate pages in Canvas for each tab content. Once the individual page is complete, copy the HTML from that page into the “PUT THE CONTENT FOR THE NTH TAB HERE” location. This will allow you the flexibility of more easily working in the rich content editor with the content and preserve the page structure within this code

Resources

Text files and placeholder images may be found in this folder.

Canvas Q&As

Questions have arisen during Canvas training sessions. I am listing those questions and answers here and will update as questions are added.

What do I do for a student with an incomplete?

We set term beginning and end dates within Canvas. Once the term passes students will only have view access of a course. If the student has an “Incomplete” they will need a way to access the course to submit unfinished work. As an instructor you can allow a student access by setting course participation dates. The course participation dates will override the term dates. Please note that doing so will change the access for all students in the course. You may want to unpublish all else except what the select student(s) will need.

Can I import grades into the Canvas gradebook?

The instructions on this page share the steps to import grades into Canvas.

How do I download and re-upload at once all student submissions?

It is possible to download all student submissions to an assignment.

It is also possible to re-upload student files back to Canvas. You will want to make sure you have not changed the names of the submission files from your bulk download. Canvas will not be able to recognize the files that should be replaced if the file names are different.

Is it possible for me to create an anonymous survey?

Anonymous survey is possible. (Select Survey Type, point 4) One note about the anonymous survey:  
“The anonymous option can be enabled or disabled before or after a survey has received submissions, allowing a user with sufficient permissions to see a student’s identity and responses. To collect fully anonymous survey responses, you may want to use a third-party survey tool.”

How can I import a course from Moodle to Canvas?

Here a link to a video demonstration of how to backup a course in Moodle and import into Canvas.

Why don’t I see any past enrollments on my “All Courses” page?

Whether a course appears in current or past enrollments is controlled by the term dates. If all the courses listed are for Fall ‘21 and beyond, then there will be no past enrollments.

How can I access and manage question banks in Canvas?

Question banks are imported from Moodle courses which contain them. Here is some information about accessing and managing question banks.

Does the Canvas quiz/survey support question branching?

This doesn’t currently exist in the quiz tool or currently in the new quiz engine Canvas is developing. There is a convoluted way you could create something like this in a course, but I don’t know that I can recommend this as a way you should go. One option you might try is using a Microsoft Form to create a quiz with branching.

How can I download all my course files?

I am pleasantly surprised that this is possible for you (and students if they have access to the Files area.)

How do I give a student extra time on a quiz?

This is possible using quiz moderation.

Can I set different due dates for different groups of students within a course?

This is possible. One thing this solution references is sections. Because of the way we are syncing enrollments, faculty are prohibited from creating/managing sections. If using groups does not work for you please contact me and we will investigate how to get this working for you.

Perusall Exchange, May 17-28

I was just made aware of an opportunity for anyone who uses or is interested in learning more about Perusall: Perusall Exchange. The event will be held May 17 (today) through May 28.

A banner with the information: Perusall Exchange 2021, May 17-28
Dear Peruser,   From May 17-28, more than 1,200 of your colleagues will participate in Perusall’s first community event: a truly social asynchronous conference. The Perusall Exchange will offer  50+ sessions across a diverse array of disciplines that highlight innovative pedagogical approaches by instructors using our platform. The conference is free to attend. View the program and register today!  

View Program  

Pick and choose from sessions that pique your interest and watch whenever it suits your schedule. Ask questions or chat with other participants synchronously if they are online at the same time as you, or asynchronously if they are not.   At the end of the conference, presenters and participants will gather in live sessions to continue the discussion. The live sessions include: Promoting Equity and Inclusivity with Perusall Maximizing Student Engagement with Perusall Transitioning Back to Campus with Perusall Register today to stay up-to-date and get quick access on May 17th. We hope you can join us to share your ideas and connect.  We look forward to seeing you at the Exchange!   Take care,   The Perusall Team

Moodle Support Videos and Links

This post will be used to host links to all the Moodle workshop, support videos, and links. Links will be grouped as best as possible by topic. If there is a Moodle support topic you would like to request, please contact Jedidiah Rex.

Course Design

Grading and Assessment

Tools

Moodle: Demystifying the Gradebook Session Summary

The Moodle gradebook can be a confusing, headache-inducing, tangle. But it doesn’t have to be. The strategies shared in this session and post can help make the Moodle gradebook more clear to instructors and students about how grades are calculated. Bringing clarity increases transparency making the gradebook more usable and inclusive.

There are a number of different methods to arrive at a grade, called aggregation methods. There are three which were the focus during the session: weighted mean of grades (WM), simple weighted mean of grades (SWM), and Natural aggregation. These three methods should be able to address the majority of desired grading scenarios.

Each of these may be used to arrive at the same grade. But they each calculate grades in a slightly different way. One big difference between WM, SWM, and Natural is that the first two normalize the grades to be out of 100 (points or percent). This can potentially create lack of clarity about how a grade is calculated. Natural used to be called “Sum of grades” and at default functions in the same way. For Natural then, the category and course totals are a sum of all the grades contained within. You can see a comparison of the three methods in the session video beginning at 0:07:50.

Strategies

Whether an instructor chooses WM-SWM or Natural grading there are some strategies that can be utilized to make the Moodle gradebook more usable.

Start with your syllabus – What is meant by this is that an instructor should review how their grading strategy is laid out in their syllabus and replicate this in the Moodle gradebook. Many instructors use categories of grades i.e. Assignments, Quizzes, Exams, Final Exam, or Participation. Create these categories in the gradebook first, before adding activities or grade items. In addition to creating an organizing structure this approach allow an instructor to add activities directly to categories when they are created making less work down the road.

Use numbers – The Moodle gradebook calculates most accurately with numbers. It can use and display letter grades, but doing so can introduce some variability. For instance, does an “A” mean 100, or 94, or… ? Scales (check, check minus, or satisfactory/unsatisfactory) are difficult or impossible in some cases for Moodle to use in calculation. If an instructor desires the grades be displayed in certain way there are options for controlling this.

Keep it simple – While it is possible to mix and match aggregation methods, to use extra credit, drop the lowest ‘x’ grades, and nest categories, doing so can make it less clear to students how a grade is calculated. Anything an instructor can do to make this is as clear as possible limits challenges to grades, and through understanding created through transparency, allows the student to engage more fully.

If you have questions about setting up your gradebook, or about grading in Moodle please contact Jedidiah Rex.

Session Video

The recording of the session (1:18:12) is posted below. It is only available to Lawrence University faculty and staff.

Resources

https://docs.moodle.org/38/en/Grade_aggregation
https://docs.moodle.org/38/en/Grades_FAQ
https://docs.moodle.org/38/en/Grader_report